In this post you will learn how we merged React Components into our Backbone Single Page App running on Nodejs/ExpressJS (with EJS templating engine).
We will merge in React from a template Create React App, and then customise our project to plug in React so we can gradually replace Backbone Views with React Components.
Webpack is going to be important to provide our builds, and we'll look at how to connnect React with EJS,and to use versioned builds for cache busting.
There's a LOT here, and we'll go step by step resolving problems as they arise so you undrstand the decisions at each step.
Install npx:
$ npm install -g npx
In a folder separate from your app, create a react app:
$ npx create-react-app react-base
NOTE: Create React App requires Node 8 or higher.

npx: installed 98 in 8.912s
You are running Node 4.5.0.
Please update your version of Node.
Update NodeJs (if needed).
We upgraded to nodejs v12.
SEE: /how-to-migrate-nodejs-from-v4-5-to-v12-step-by-step/
OK, with nodejs (v12) installed, lets go ahead and install create-reacte-app. Our plan is to create a temp app with allhe React app template code, then e’ll copyover the package.json settings and load the packages into our main app.
Create React App
Navigate to a separate folder, so we can create the React app and then execute:
$ npx create-react-app {name}
Eg
$ npx create-reat-app ex
Migrate React Dependencies:
Open package.json in the React app folder, and copy the following settings to our main app:
Scripts:
"scripts": {
    "start": "react-scripts start",
    "build": "react-scripts build",
    "test": "react-scripts test",
    "eject": "react-scripts eject"
  },
Dependences:
	 "dependencies": {
    "@testing-library/jest-dom": "^4.2.4",
    "@testing-library/react": "^9.5.0",
    "@testing-library/user-event": "^7.2.1",
    "react": "^16.13.1",
    "react-dom": "^16.13.1",
    "react-scripts": "3.4.1"
  },
- BrowsersList is a single place to define target browsers that can be shared and used by tools like Babel. Typical dev usage is to specify “last 1” or “last 2” so versions will automatically update.
SEE https://www.npmjs.com/package/browserslist
- React uses browserslist to know which browser versions to target in the build process.
SEE: https://create-react-app.dev/docs/supported-browsers-features/
browsersList:
"browserslist": {
    "production": [
      ">0.2%",
      "not dead",
      "not op_mini all"
    ],
    "development": [
      "last 1 chrome version",
      "last 1 firefox version",
      "last 1 safari version"
    ]
  }
eslint: (not copied)
NOT COPIED: [“eslintConfig”]
Our existing project does not use eslint. If we add this, we are going to end up touching a LOT of files. (Eslint is great, but that will be a separate task to apply ESLint project wide.)
"eslintConfig": {
    "extends": "react-app"
  },
UPDATE your project:
$ npm update
AUDIT FAILURES:
We encountered a number of audit failures, of which many were resolved using:
$ npm audit fix
32 vulnerabilities required manual review and could not be updated
6 package updates for 70 vulnerabilities involved breaking changes
(use npm audit fix --force to install breaking changes; or refer to npm audit for steps to fix these manually)
NOTE: Not all audit failure were fixed as many are breaking changes.
Copy Index.html and Index.js:
Copy essential React files from the React app folder:
- Copy public./index.html
- Copy src/index.js
Start React in our Project Folder to ensure everything is runnng OK:
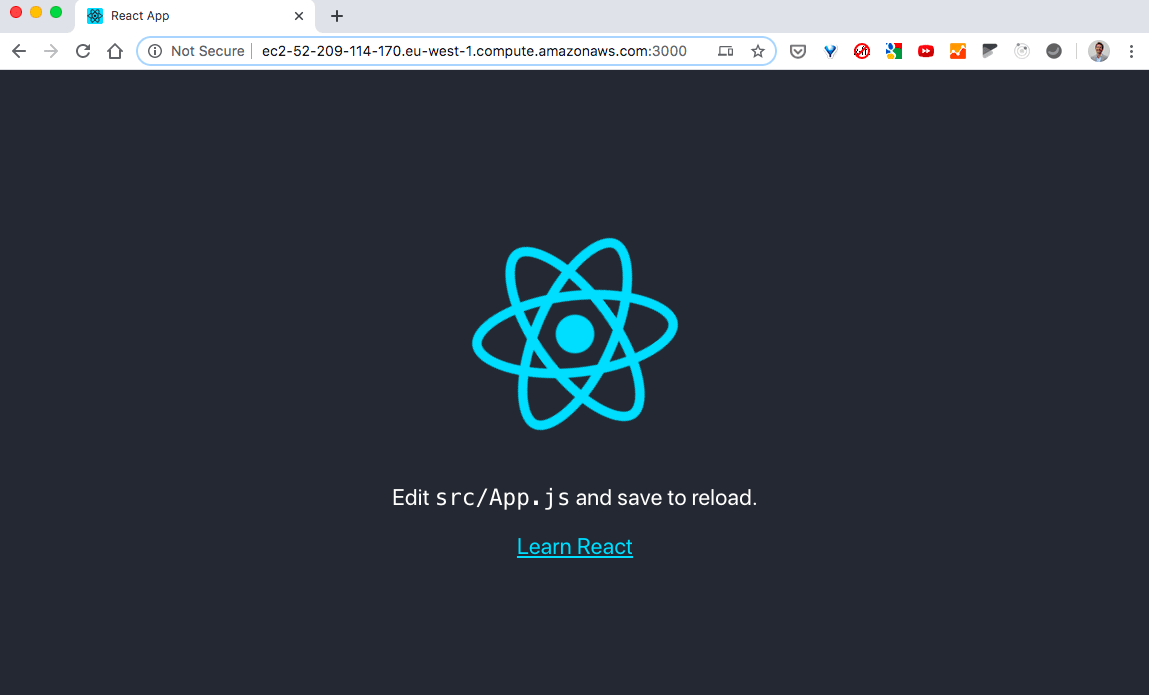
$ npm run start
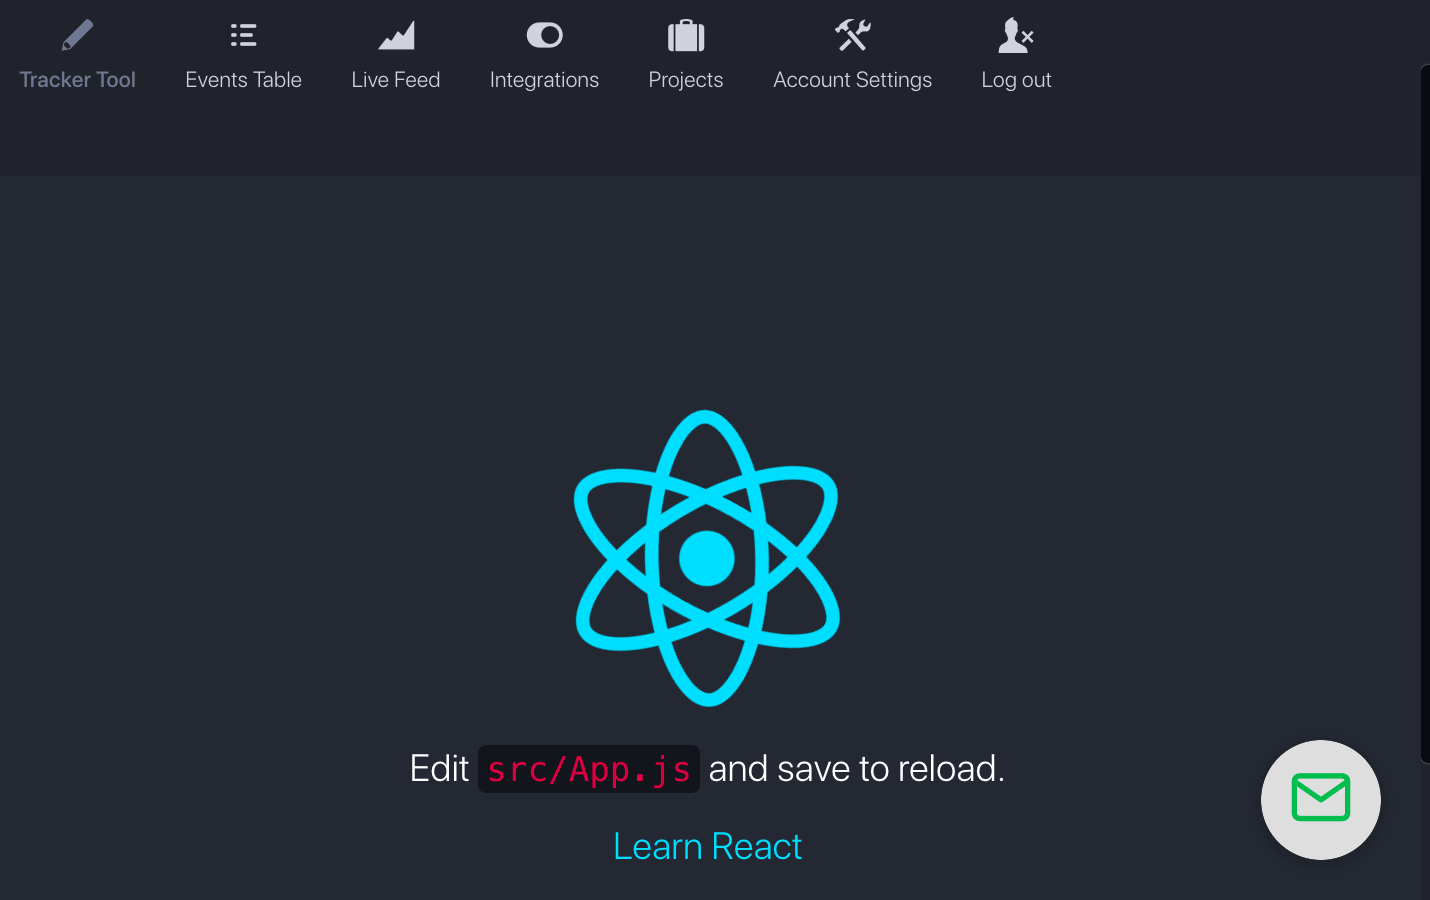
Compiled successfully!
You can now view ex in the browser.
Local: http://localhost:3000
On Your Network: http://172.31.5.33:3000
Note that the development build is not optimized.
To create a production build, use npm run build.
AMAZON EC2 Instance: How to open Port 3000:
When you start React by default in development using “npm start”, react will run on port 3000
If you are runing dev via EC2 (as we do here on our dev team), you need to open Port 3000 in your Amazon EC2 instance:
-
Login to your Amazon EC2 account and go to EC2 > Security Groups.
-
Select the Security Group assigned to your instance.
-
Click Edit Inbound Rules button and add Custom TCP
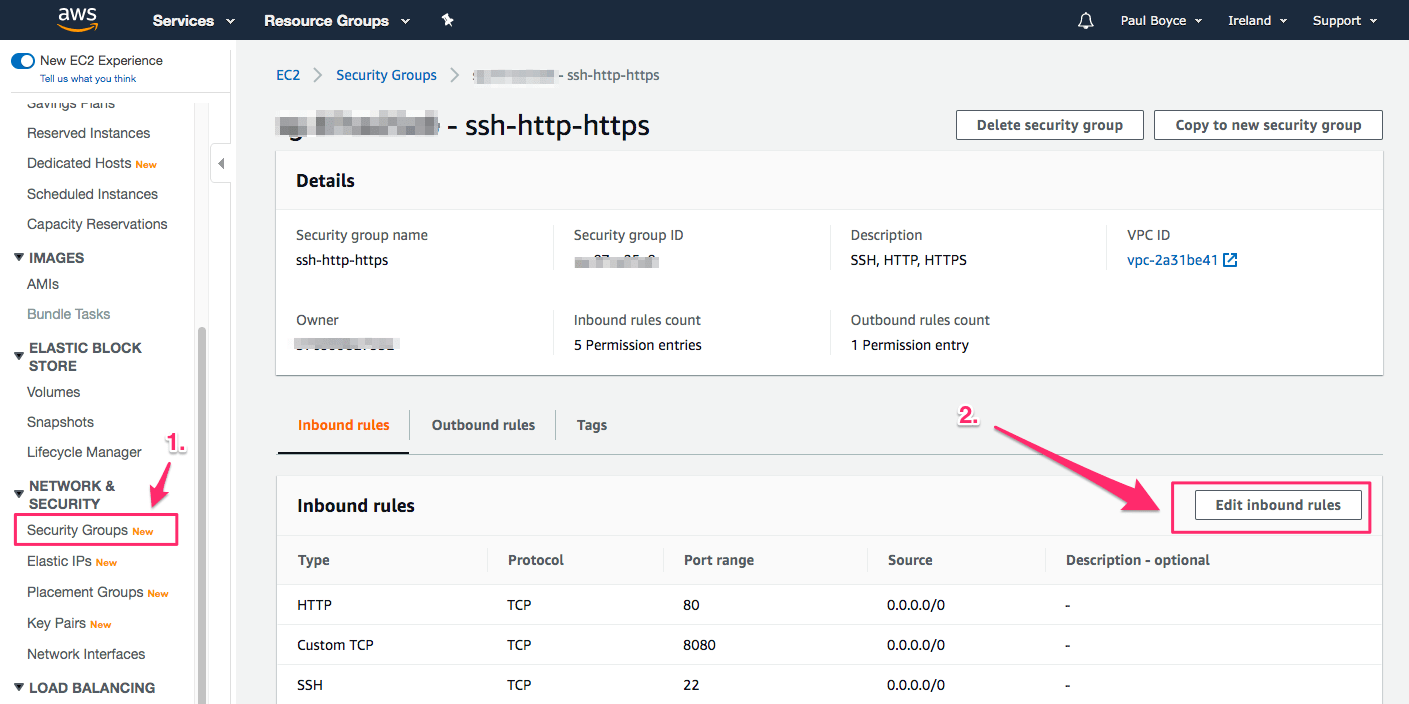
-
The Add a new Custom TCP record, for Port 3000 as shown below.
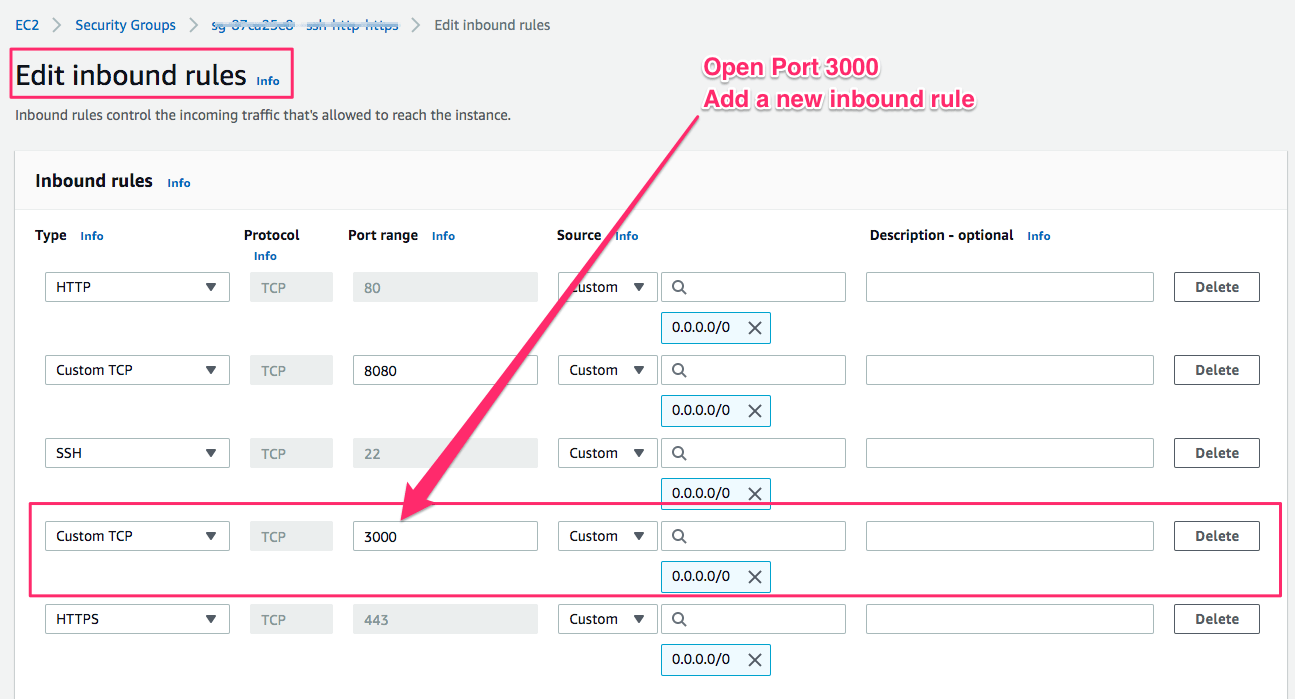
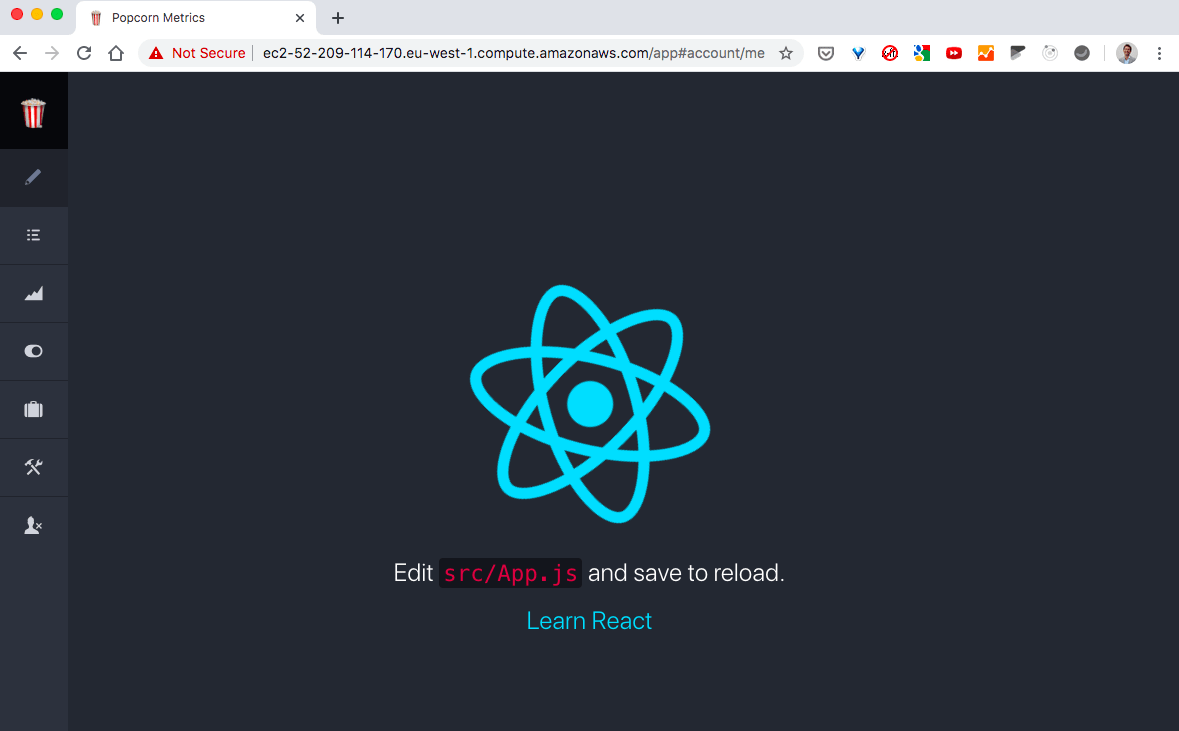
Basic React App Successfully Installed and running on EC2 Port 3000
Ok, now with Port 3000 open we can open the basic react App as merged into our app codebase. (Yay!)
(NOTE: At this stage we have verified a successful install of React App compnents to our project. We still have to load React INTO the codebase, which we'll come to shortly....)
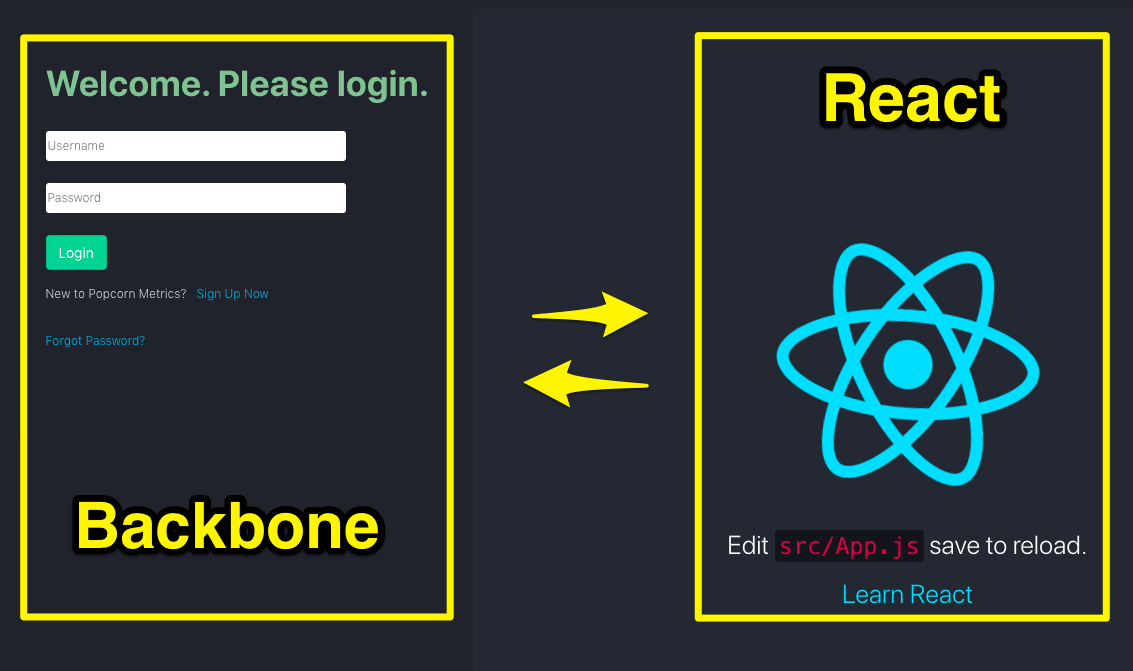
Get react Running inside our Single Page App (Backbone App)
First, Lets get React running inside our ExpressJS EJS Pages
Lets remember our goalhere: we are adding React to our Single Page App (SPA) written in Bootstrap. The goal then will be to migrate individual Bootstrap components/views to replace with React Components. Eventually we'll be able to remove Bootstrap, but this will be a gradual prcess, and as we advance, the two need to coexist.
So, before we begin to integrate React inside our actual Bootstrap app, we first need to get React deploying inside the app.
We use ExpressJS with EJS templates. Our main entry point for Bootstrap is an template file. So, we are going to do two things: (1) install React to the EJS template, (2) add a #root <div> to the EJS template where react can attach and render.
When you start react with npm start, React will run on port 3000. But we ALSO have our ExpressJS/Nodejs app running on port 80 (and 443 for SSL). That introduces some complications in having two servers on different ports.
To simplify, we will jump ahead to use React production build files in our work. The upside is we get to ignore the "two ports" issue. The downside is we lose benefit of Hot Deployment, so we'll need to rebuild evry ime in our development process. (This will slow up dev a little.) But using bbuild files lets us at least get React working. Later we'll revers into a solution using development files and hot deployment.
Steps to add React production Build Files to ExpressJS/EJS:
- BUILD FILES:
Run start-react:
$ npm start-react
React will produce production build files in folder /build/static:
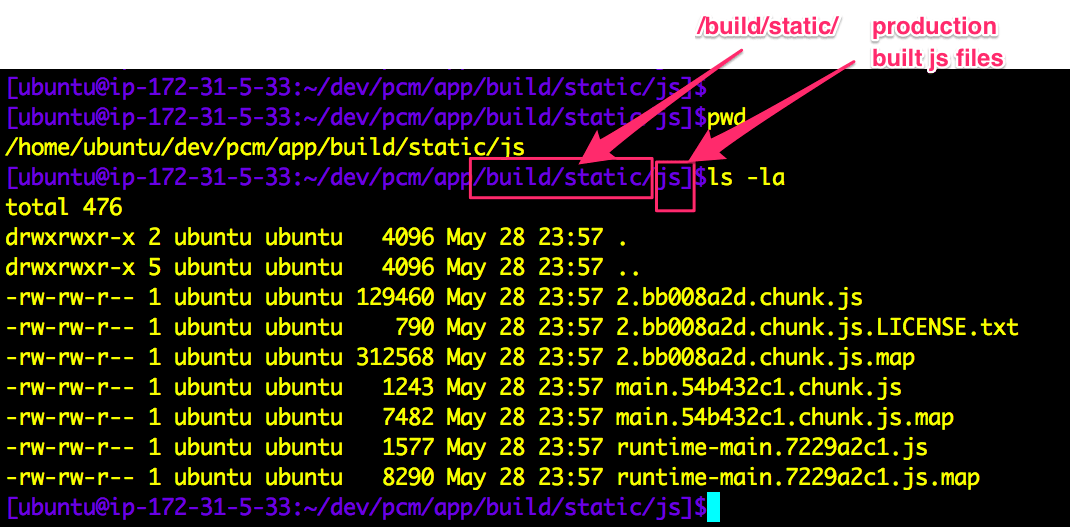
NOTE: /build/static contains js, css and media folders
- ADD BUILD FOLDER to ExpressJS: In our ExpressJS app.js file, add the following to add the React
buildfolder to the path (later well move this to adistfolder):
const path = require('path');
app.use(express.static(path.join(__dirname, 'build')));
- ADD REACT BUILT FILES (js/css) to EJS Template:
In our EJS template file add the following:
<link rel="stylesheet" href="/static/css/main.5f361e03.chunk.css" />

<div id="react-root"></div>

<script src="/static/js/runtime-main.7229a2c1.js"></script>
<script src="/static/js/main.54b432c1.chunk.js"></script>
<script src="/static/js/2.bb008a2d.chunk.js"></script>
NOTES:
- We don't need to add the .map files.
- Every time we build the app these filenames will change, so we'll need to manage that in the EJS template.
When we restart our nodejs/express server we now see the React App component and our Backbone single page app. This is a BIG step forward! We now have React AND Backbone delivered via Node/Express/EJS
Automate Built React Production Files for Expressjs/EJS:
Lets automate our build process so we don't have to manually update the EJS template references to build files every time we rebuild React.
At this point we have a number of choices.
We could:
- write some js code into our app.js to read the file names from the /build/static dir and create the
<script>and<link>tags for the js and css to then pass into our EJS template. - eject from the Create React App goodness. (A one way adventure and we lose auto updates.)
- use
webpackto compress our build files so the names are fixes in our dev.
Lets run with webpack....
Webpack
1. Add the following to our package.json:
 "devDependencies": {
    "@babel/core": "^7.10.1",
    "@babel/preset-env": "^7.10.1",
    "@babel/preset-react": "^7.10.1",
    "babel-loader": "^8.1.0",
    "css-loader": "^3.5.3",
    "file-loader": "^6.0.0",
    "style-loader": "^1.2.1",
    "webpack": "^4.43.0",
    "webpack-cli": "^3.3.11"
}
2. Update our packages:
$ npm install
3. Update app.js for Nodejs/Express
Update app.js for Nodejs/Express to include a dist folder for our React code (I could use our existing dist folder for the app, but I want to keep react code separate while we migrate and we can have any number of dist folders.)
app.use(express.static(path.join(__dirname, 'dist_react')));
4. Create a webpack config file (webpack.config.js) as below:
This file:
- takes src/index.js as a baseline (so we don't depend on index.html as an entry point, unlike Create React App scripts)
- creates our distribution bundle in a folder called dist_react (Equally dist would be fine but I delivbeately want to keep the react code separate while we migrate from Backbone to React and a separate dist folder gives more clarity and control in development)
- uses
style-loaderandcss-loaderto inject CSS<style>tags (direct to the HTML page ) for CSS files included in React components - uses
babel-loaderto process ES6, React/JSX etc - uses
file-loaderto serve images
const path = require('path');

module.exports = {
  entry: './src/index.js',
  output: {
    filename: 'bundle.js',
    path: path.resolve(__dirname, 'dist_react'),
  },
 module: {
    rules: [
        {
            test: /\.css$/, use: ['style-loader', 'css-loader']
        },
        {
            test: /\.m?js$/,
            exclude: /(node_modules)/,
            use: {
                loader: 'babel-loader',
                options: {
                    presets: ['@babel/preset-env', '@babel/preset-react']
                }
            }
        },
        {
            test: /\.(png|svg|jpg|gif)$/,
            use: [
                'file-loader',
            ],
        }
    ]
  },
};
5. EJS Template Webpack bundle.js
Update the EJS template to point to our new webpack bundle.js file:
<script src="/bundle.js"></script>
6. Package.json
Add the following script to package.json:
"scripts": {
    ...
    "build-react-webpack": "webpack --config webpack.config.js"
  },
Or better, to have separate tasks for DEV and PROD builds:
"scripts": {
    ...
    "build-react-webpack-dev": "webpack --config webpack.config.js --mode=development",
    "build-react-webpack-prod": "webpack --config webpack.config.js --mode=production"
  },
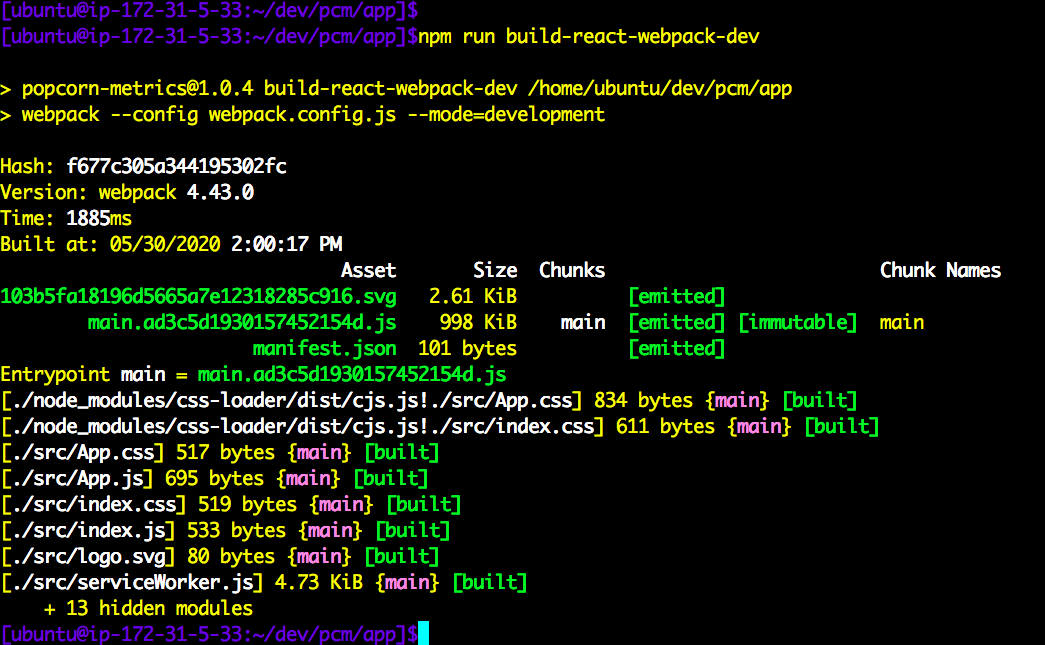
7. Build Webpack (DEV)
Now we can run in DEV as:
$ npm run build-react-webpack-dev
Cache Bust Using Hashed Filenames & Linking Dynamically to EJS
PROBLEM:
Our bundle.js file is fine for DEV if we're going to manually refresh our page, but for distributing, we'll want to hash the asset filenames for automatic cache busting to the new hashed file versions.
SOLUTION:
We're going to get webpack to add hashed names to our assets. Then we'll need to replace our EJS script link to "bundle.js" with a link to the dynamic assets. But how to update those names in our EJS? Helpfully webpack can produce a Manifest that lists all built files. So, we can read thatmanifest, and then inject <script> tags for each js asset. (You can read more about webpack manifest here.)
Changes:
- Package.json: Update our package.json to add new modules:
clean-webpack-plugin
webpack-manifest-plugin
- Webpack Config: Update our webpack.config.js to add CleanWebpackPlugin and ManifestPlugin.
Our updated webpack.config.js looks like this:
const path = require('path');
const { CleanWebpackPlugin } = require('clean-webpack-plugin');
const ManifestPlugin = require('webpack-manifest-plugin');

module.exports = {
  entry: './src/index.js',
  output: {
    filename: '[name].[contenthash].js',
    path: path.resolve(__dirname, 'public/dist_react'),
  },
 plugins: [
     new CleanWebpackPlugin(),
     new ManifestPlugin()
 ],
 module: {
    rules: [
        {
            test: /\.css$/, use: ['style-loader', 'css-loader']
        },
        {
            test: /\.m?js$/,
            exclude: /(node_modules)/,
            use: {
                loader: 'babel-loader',
                options: {
                    presets: ['@babel/preset-env', '@babel/preset-react']
                }
            }
        },
        {
            test: /\.(png|svg|jpg|gif)$/,
            use: [
                'file-loader',
            ],
        }
    ]
  },
};
- Main Express App.js: In our app.js, we'll add a new function to read the Manifest.json and create
<script>tags.
const createTagsFromDistManifest = function () {
  let scriptTemplate = '';
  try {
     let manifestRaw = fs.readFileSync('public/dist_react/manifest.json');
     let manifest = JSON.parse(manifestRaw);

     let vals = Object.values(manifest);
     const REGEX = RegExp(/\.m?js$/);
     vals.forEach(element => {
         if (REGEX.test(element)) {
             scriptTemplate += `<script src=\"dist_react/${element}\"></script>`;
         }
     });
  }
  catch (err) {
     console.error(`ERROR reading manifest. Check file webpacck ran OK and file exits. ERROR: ${err.message}`);
  }
  finally {
     return scriptTemplate;
  }
}
- EJS Template (build
<SCRIPT>tags): We'll inject those tags as parameters to EJS.
Replace our hardcoded bundle file with a dynamically build set of <SCRIPT> tags to inject assets:
Remove this:
res.render('app_variant.ejs', {bootPath:bootPath });
Replace with this:
 res.render('app_variant.ejs', {bootPath:bootPath,
                               scriptTemplate:createTagsFromDistManifest() });
NOTE: scriptTemplate:createTagsFromDistManifest()
- EJS Template (inject
<SCRIPT>tags): Update our EJS template to replace hard coded reference to bundle.js with our dynamically injected scripts viascriptTemplate:
Replace hard coded bundle.js:
<script src="bundle.js"></script>
...with <%- scriptTemplate %> for dynamic injection:
<%- scriptTemplate %>
Weback Build Assets:
Now, when we run our webpack build, we see the hashed assets:
And in our dist folder (public/dist_react):

Inside manifest.json we see:

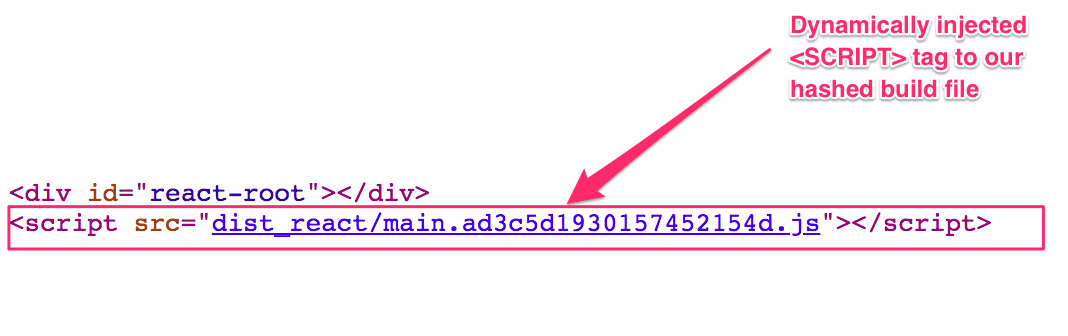
Injected Assets via Script Tags:
And our injected <script> tags in our EJS template:
Summary so far...
We have successfully installed React into our Express/EJS/Backbone project, and used Webpack to build versioned code we can use both for dist as well as during development.
We still need to separate our config to use hashed chunked minimised files for PROD and bundle.js for DEV. And of course integrate React components into our app to replace backbone views.
First... lets setup Webpack Hot Module Reload for Nodejs/ExpressJS to make our DEV process faster. We'll then follow that with a Webpack config for Production Build.
Finally with everything in place for DEV and PROD builds, we'll start the actual replacing Bootstrap Views with React Components.
How to Setup our Webpack React Code for Hot Updates in DEVELOPMENT
So far our Webpack build uses one common config file and pass in the mode from our package.json.
Next we'll split our Webpack config into two separate configs, as follows:
- DEVELOPMENT: Hot Module Replacement
- PRODUCTION: Optimised Bundle for distribution
Webpack Hot Module Replacement (HMR) for Nodejs/ExpressJS React Code
The standard Create React Script for running React Code in DEV uses Webpack Dev Server running on localhost:3000. But our app is served via Nodejs/ExpressJS so we don't want to use Webpack Dev Server.
I can tell you this took me some time to setup correctly, but it is worth it. Webpack Hot Module Replacement works beautifully in ExpressJS.
I will save you the hard work and take you straight to the solution.
But first, an overview:
To get Webpack Hot Module Replacement (HMR) you'll need three things:
- ExpressJS Version 4 (we upgraded fo V3)
- Express Plugins:
- A Webpack Config for DEVELOPMENT webpack.config.dev.js
#### SIDE NOTE on ExpressJS and Webpack HMR:

Express v3 and HMR simply refused to work.  I didn't find any specific documentation stating that, but I took a working version of HMR running on ExpressJS version 4 and dropped the version down to ExpreessJS v3.  It stoppd working immediately.  The problem seems to be that the Event Emitter doesnt function as needed in ExpressJS v3.

So, first, if you are not running ExpressJS v4, you'll need to migrate.

It is not overly difficult. The main difference is you will need to install separate middleware packages (e.g. compression, cookie-parser, cookie-session) that were previously bundled with ExpressJS v3.
Migration to ExpressJS 4 is out of scope for this post, but you can find official documentation here: Moving from Express 3 to Express 4
Webpack Config for HMR
Here is our new webpack.config.dev.js file:
const path = require('path');
const webpack = require('webpack');

module.exports = {
  mode: 'development',
  context: __dirname,
  entry: [
    // Add the client which connects to our middleware
    'webpack-hot-middleware/client?path=/__webpack_hmr&timeout=20000',
    // And then our app code entry point
    './src/index.js'
  ],
  output: {
    path: path.resolve(__dirname, 'build_webpack'),
    publicPath: '/build_webpack',
    filename: 'bundle.js'
  },
  devtool: '#source-map',
  plugins: [
    new webpack.HotModuleReplacementPlugin(),
    new webpack.NoEmitOnErrorsPlugin()
  ],

 module: {
    rules: [
        {
            test: /\.css$/, use: ['style-loader', 'css-loader']
        },
        {
            test: /[^\.]\.M?js$/,
            exclude: /(node_modules)/,
            use: {
                loader: 'babel-loader',
                options: {
                    presets: ['@babel/preset-env', '@babel/preset-react']
                }
            }
        },
        {
            test: /\.(png|svg|jpg|gif)$/,
            use: [
                'file-loader',
            ],
        }
    ]
  },
};
Here are our changes to our Nodejs app.js file:
(function loadWebpackHMR () {

    app.use(express.static(path.join(__dirname, 'public/build_webpack')));

    // Step 1: Create our webpack compiler:
    var webpack = require('webpack');
    var webpackConfig = require('./webpack.config.dev');
    var compiler = webpack(webpackConfig);

    // Step 2: Attach webpack-dev-middleware for serving in-memory files emitted from webpack (**DEV only**)
    app.use(require("webpack-dev-middleware")(compiler, {
        logLevel: 'info', publicPath: webpackConfig.output.publicPath
    }));

    // Step 3: Attach webpack-hot-middleware for hot reloading in ExpressJS server instead of Webpack Dev Server:
    app.use(require("webpack-hot-middleware")(compiler, {
        log: console.log, path: '/__webpack_hmr', heartbeat: 10 * 1000
    }));
})();
1. Loads our new webpack.config.dev.js
2. All our Webpack React code for DEV now goes into one file: **bundle.js**
2. HMR events will be emitted at path **/webpack_hmr**
3. You can smoke-test that HMR events are emitting correctly via:
   `curl {your dev server}/__webpack_hmr`
Middeware webpack-dev-middleware basically provides in-memory webpack files as well as Hot Module Reload updates emitted from webpack (use for DEV only. not for PRODUCTION!)
Middleware webpack-hot-middleware sets you free from Webpack Dev Server so you can connect your browser client to your Nodejs server & receive updates from the server and execute those changes using webpack's HMR API.
Install these packages (for DEV) to your project via (Flag -D is equal to --save-dev):
$ npm install -D webpack-dev-middleware, webpack-hot-middleware
Next lets update function createTagsFromDistManifest() to inject our Webpack Bundle bundle.js to our EJS template for DEVELOPMENT :
const createTagsFromDistManifest = function () {
  let scriptTemplate = '';
  try {

    if (process.env.NODE_ENV === 'development') {

        console.log("[WEBPACK ASSETS: (DEV)]: Injecting Bundle with HMR Hot Module Replacement (async)");

        scriptTemplate = `<script type="text/javascript">
            window.setTimeout(
                function injectBundleAsync() {
                    console.log("Injecting Webpack Bundle with HMR Hot Module Replacement (async)");
                    var tag = document.createElement("script");
                    tag.src = "build_webpack/bundle.js";
                    var target = document.querySelector("body").appendChild(tag);
                }, 1);
        </script>`;

    } else {  //PRODUCTION:

      let manifestRaw = fs.readFileSync('public/dist_react/manifest.json');
      let manifest = JSON.parse(manifestRaw);

      let vals = Object.values(manifest);
      const REGEX = RegExp(/\.m?js$/);
      vals.forEach(element => {
         if (REGEX.test(element)) {
             scriptTemplate += `<script src=\"dist_react/${element}\"></script>`;
         }
      });
    }
  }
  catch (err) {
     console.error(`ERROR reading manifest. Check file webpack ran OK and file exits. ERROR: ${err.message}`);
  }
  finally {
     return scriptTemplate;
  }
}
Finally lets update our React App to acccept Hot Module Reload updates:
import React from 'react';
import ReactDOM from 'react-dom';

import './index.css';
import App from './App';

console.log("Loading React App...");

ReactDOM.render(
    <App />,
  document.getElementById('react-root')
);

// Accept Hot Module Reload updates:
// ---------------------------------
if (module.hot) {
    console.log("Accept hot module..");
    module.hot.accept();
}
Note those last three lines:
if (module.hot) {
    console.log("Accept hot module..");
    module.hot.accept();
}
The module.hot.accept() accepts changes from Webpack HMR. This is the most basic implementation, an all we need at this stage. By putting this code inside index.js, it acts as a "catch all" and any nested components will also refresh.
(Read more about the Module API for accepting Hot Module Reloads. You can go deeper on HMR accept() strategies here, but be aware that we are using HMR middleware in ExpressJS and not Webpack Dev Server.)
Ok, now we're all set for Hot Module Reload via Webpack INSIDE our Nodejs/ExpressJS server. Now when we make any changes to code under our entry pont (src/index.js) the HMR will kickin and we'll see updates render on the browser.
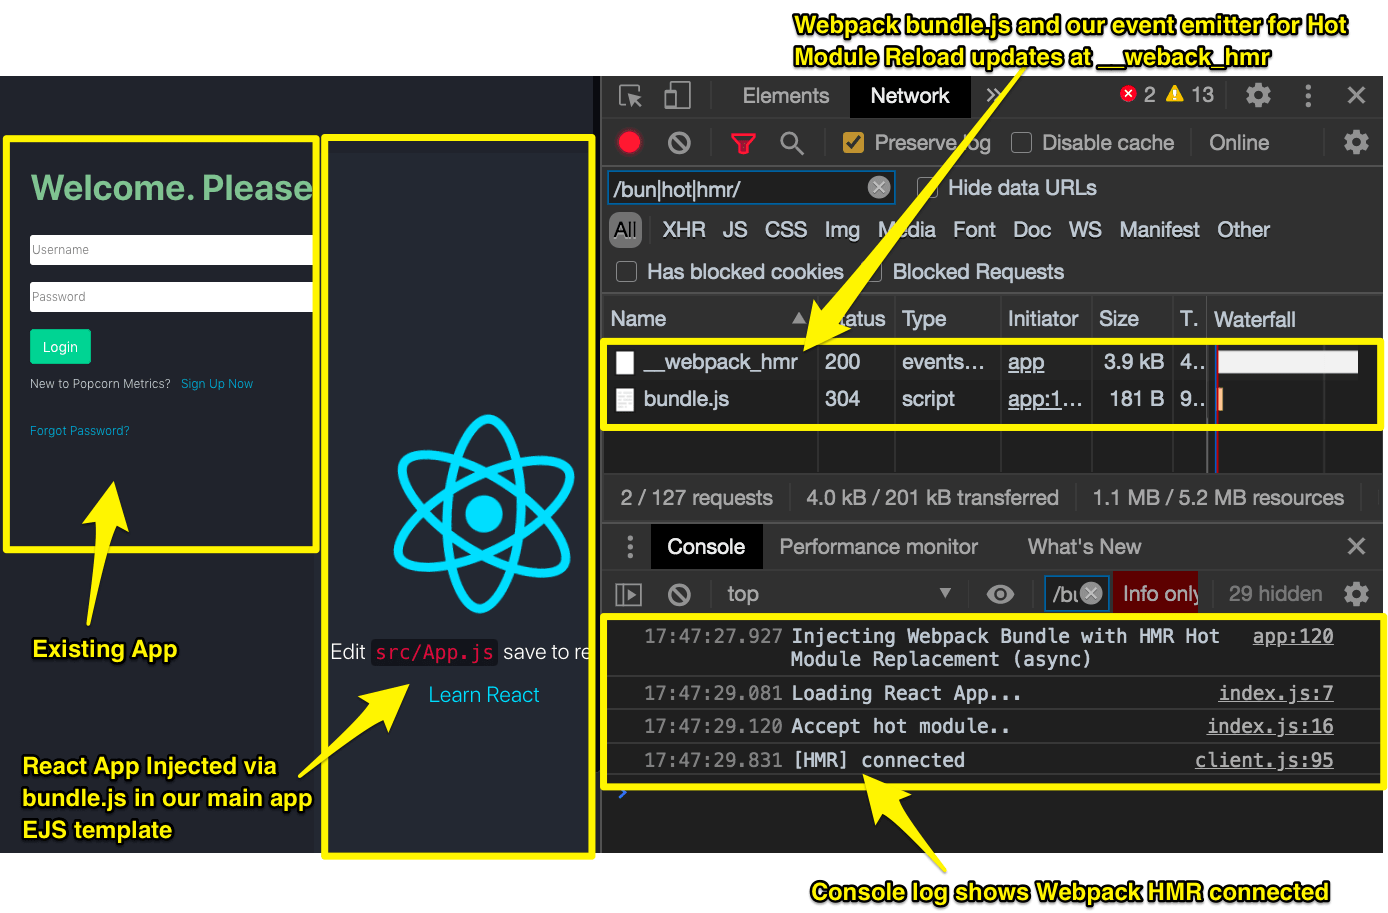
Here is our browser BEFORE we edit code:
On the left, in the Chrome browser window you can see our main Backbone App wth React injected.
On the right (top) you can see the network panel. bundle.js is our React App code bundled and served by Webpack in ExpressJS. Below you can see some console output. Notice the last line "[HMR] connected".
And here is our browser AFTER a code edit
(live hot updates, no need to refresh or page--and remember this is Webpack in ExpressJS without a Webpack Dev Server).
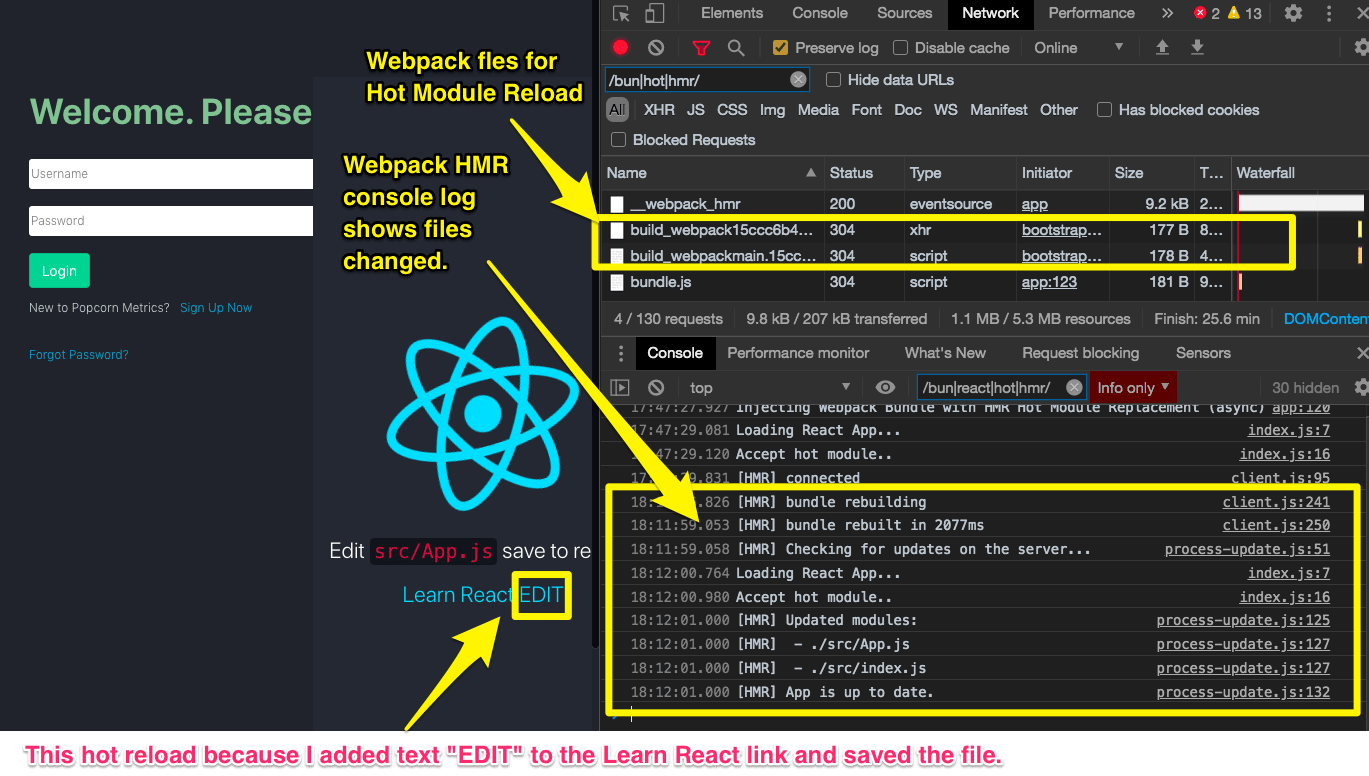
On the left, in the Chrome browser window I had edited the React App code (notice Learn React EDIT). That change triggered the Hot Module Reload.
On the right (top) in the network panelare two new files prefixed build_webpack{...} served by Webpack HMR in ExpressJS. Below the console shows the HMR rebuild and affeccted files.
Notice the last line: "[HMR] App is up to date".
This is going to make our development got a LOT faster!
TIP:
-
In the Network panel this regex filter helped me declutter the network listing:
/bun|hot|hmr/ -
In the Console this regex filter helped me declutter the log:
/bun|react|hot|hmr/
SIDE PANEL:
===========
A quick side note on how HMR works behind the scenes:
HMR depends on an Eventsource that pushes an Eventstream of Server Side Events (SSEs) from the server to the browser.
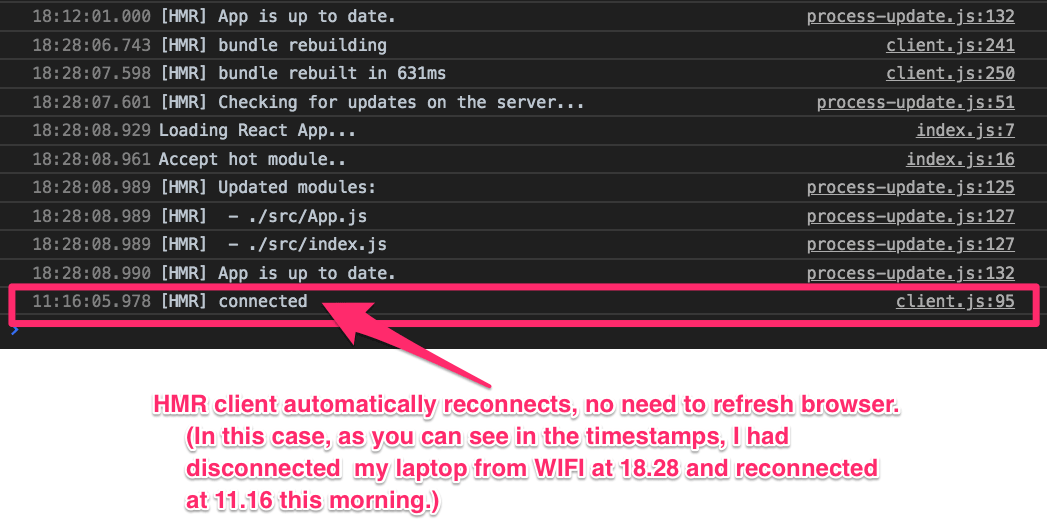
Eventstreams/SSEs were a precursor to the (more well known) websockets, offering a simple unidirectinal push notification from Server to a subscribed Client.
They are great for cases when you just want to receive updates. They are also very robust as the automatically reconnect in event of network failure.
In the demo above, try disconnecting your browser machine from the network/WIFI for a few mins and reconnect: then watch your console and you will see HMR automatically reconnect.(See below)
Nomally if you use Webpack Development Server (WDS, these Eventstream/SSEs are emitted from WDS. In our case, the events are emitted from our Nodejs/ExpressJS server via the webpack-hot-middleware plugin.
HMR client automatically reconnects, no need to refresh browser.
(In this case, as you can see in the timestamps, I had disconnected my laptop from WIFI at 18.28 and reconnected at 11.16 this morning)
Now we have Webpack setup for DEV, let's get back and optimize our Webpack build for PRODUCTION.
How to Setup our Webpack Optimised Bundle for PRODUCTION
Our aim here is simple: to produce an webpack configuration that will build our React app code for distribution. We'll want to continue to use chunk hashes for automatic cache busting. And to have our code compressed.
The full listing follows, but the main differences to note are:
NOTE 1. TERSER MINIMIZER
We're using Terser as our code minimizer:
$ npm install --save terser-webpack-plugin
const TerserPlugin = require('terser-webpack-plugin');
NOTE 2. MODE:
We set our mode to PRODUCTION:
mode: 'production',
NOTE 3. OPTIMIZATION/MINIFY/CHUNKS:
We added an optimization to our config:
See below that optimization happens via Terser, and that we're separating vendor code from our main bundle. We also separate the runtime chunk for longterm caching. (This optimisation is based on Create react App configuration.)
 optimization: {
    minimize: true,
    minimizer: [new TerserPlugin()],

    // Automatically split vendor and commons
    // https://medium.com/webpack/webpack-4-code-splitting-chunk-graph-and-the-splitchunks-optimization-be739a861366
    splitChunks: {
        chunks: 'all',
        name: false,
    },
    // Keep the runtime chunk separated to enable long term caching
    // https://github.com/facebook/create-react-app/issues/5358
    runtimeChunk: {
        name: entrypoint => `runtime-${entrypoint.name}`,
    },
  }
NOTE 4. OUTPUT ASSETS/CHUNKS:
We updated the output section to place our compiled code into public/dist_webpack folder. We now added chunkFilename for our chunked code files, and set the contenthash to 8.
  output: {
    path: path.resolve(__dirname, 'public/dist_webpack'),
    filename: '[name].[contenthash:8].js',
    chunkFilename: '[name].[contenthash:8].chunk.js'
  },
NOTE 5. MANIFEST:
We've enhanced the output for the manifest.
Our manifest fileName is now explicitly defined as 'asset-manifest.json' (previously we were relying on the default name). Our new manifest now lists our entrypoint files (to inject into our EJS template, as before) under a property 'entrypoints'.
This makes dynamic parsing of filenames in createTagsFromDistManifest() easier (see below).
new ManifestPlugin({fileName: 'asset-manifest.json',
  generate: (seed, files, entrypoints) => {
    const manifestFiles = files.reduce((manifest, file) => {
      manifest[file.name] = file.path;
      return manifest;
    }, seed);
    const entrypointFiles = entrypoints.main.filter(
      fileName => !fileName.endsWith('.map')
    );

    return {
      files: manifestFiles,
      entrypoints: entrypointFiles,
    };
  },
})
Webpack Config for PRODUCTION
Here is our new webpack.config.prod.js file:
const path = require('path');
const { CleanWebpackPlugin } = require('clean-webpack-plugin');
const ManifestPlugin = require('webpack-manifest-plugin');
const TerserPlugin = require('terser-webpack-plugin');

module.exports = {
  mode: 'production',
  optimization: {
    minimize: true,
    minimizer: [new TerserPlugin()],

    // Automatically split vendor and commons
    // https://medium.com/webpack/webpack-4-code-splitting-chunk-graph-and-the-splitchunks-optimization-be739a861366
    splitChunks: {
        chunks: 'all',
        name: false,
    },
    // Keep the runtime chunk separated to enable long term caching
    // https://github.com/facebook/create-react-app/issues/5358
    runtimeChunk: {
        name: entrypoint => `runtime-${entrypoint.name}`,
    },
  },
  context: __dirname,
  entry: [
    './src/index.js'
  ],
  output: {
    path: path.resolve(__dirname, 'public/dist_webpack'),
    filename: '[name].[contenthash:8].js',
    chunkFilename: '[name].[contenthash:8].chunk.js'
  },
  plugins: [
      new CleanWebpackPlugin(),
      new ManifestPlugin({fileName: 'asset-manifest.json',
        generate: (seed, files, entrypoints) => {
          const manifestFiles = files.reduce((manifest, file) => {
            manifest[file.name] = file.path;
            return manifest;
          }, seed);
          const entrypointFiles = entrypoints.main.filter(
            fileName => !fileName.endsWith('.map')
          );

          return {
            files: manifestFiles,
            entrypoints: entrypointFiles,
          };
        },
      })
  ],

 module: {
    rules: [
        {
            test: /\.css$/, use: ['style-loader', 'css-loader']
        },
        {
            test: /\.m?js$/,
            exclude: /(node_modules)/,
            use: {
                loader: 'babel-loader',
                options: {
                    presets: ['@babel/preset-env', '@babel/preset-react']
                }
            }
        },
        {
            test: /\.(png|svg|jpg|gif)$/,
            use: [
                'file-loader',
            ],
        }
    ]
  },
};
Parse new Asset-Manifest JSON File to Dynamically Inject Assets to ExpressJS EJS Template for PRODUCTION Distribution:
Our final step is to parse the new Production distribution file list from the entrypoints property of our manifest JSON file (public/dist_webpack/asset-manifest.json):
Update function createTagsFromDistManifest() in app.js to parse new manifest file:
Here's the relevant change:
let manifestRaw = fs.readFileSync('public/dist_webpack/asset-manifest.json');
let manifest = JSON.parse(manifestRaw);
manifest.entrypoints.forEach(element => {
    scriptTemplate += `<script src=\"dist_webpack/${element}\"></script>\n`;
});
And here is the updated complete createTagsFromDistManifest() function:
const createTagsFromDistManifest = function () {
    let scriptTemplate = '';
    try {

        if (process.env.NODE_ENV === 'development') {

            console.log("[WEBPACK ASSETS: (DEV)]: Injecting Bundle with HMR Hot Module Replacement (async)");
            scriptTemplate = `<script type="text/javascript">
                window.setTimeout(
                    function injectBundleAsync() {
                        console.log("Injecting Webpack Bundle with HMR Hot Module Replacement (async)");
                        var tag = document.createElement("script");
                        tag.src = "build_webpack/bundle.js";
                        var target = document.querySelector("body").appendChild(tag);
                    }, 1);
            </script>`;

        } else { // staging|production
            console.log("[WEBPACK ASSETS: (PRODUCTION)]: Injecting entrypoints as per {public}/dist_webpack/asset-manifest.json");

            let manifestRaw = fs.readFileSync('public/dist_webpack/asset-manifest.json');
            let manifest = JSON.parse(manifestRaw);
            manifest.entrypoints.forEach(element => {
                scriptTemplate += `<script src=\"dist_webpack/${element}\"></script>\n`;
            });

        }
    }
    catch (err) {
        console.error(`ERROR reading webpack assets list [asset-manifest.json]. Check webpack ran OK and file exits. ERROR: ${err.message}`);
    }
    finally {
        return scriptTemplate;
    }

}
Updating the App: Replacing Backbone Views with React Components
Now we have our development environment ready we can begin to swap out Backbone Views for React Compoments.
Migration Strategy: Backbone to React
We're going to need to run both our Backbone app and React app at the same time.
That is easy because we'v injected react App into our main EJS template that ALSO loads our Bootstrap app. They are separate code bases. The Bootstrap code is served using RequireJS and the React code is served via our Webpack bundle.
Our EJS template contains a container where Bootstrap is injected.
The main parts of our EJS template for Bootstrap are:
Before (Bootstrap/requirejs only):
<div class="container" id="content"></div>

<script async type="text/javascript"
      data-main="js/boot" src="/js/libs/require.js"></script>
After: (Bootstrap & React/webpack bundle):
Here is our basic React App injected (as scriptWebpackTags which is generated dynamically by createTagsFromDistManifest() in our app.js)
<div id="react-root"></div>
<div class="container" id="content"></div>

<script async type="text/javascript"
      data-main="js/boot" src="/js/libs/require.js"></script>
<%- scriptWebpackTags %>
The <div> with id="content" is the container for Bootstrap.
The <div> with id="react-root" is the container for React. We position that div at the same level in the DOM. I am choosing to put it immediatly beore the Bootsttrap <div> so I can see the React components above Bootstrap n the screen, but that is a choice.
Eventually, when we've replaced ALL the Bootstrap Views we can remove the Bootstrap Container `<div>`.
Basic Container Styling for our react Compomnents
The first thing we'll do is add the same class container that the Bootstrap container uses. This allows our conainer to immediatly pick up the existing CSS/Styling to make swapping components easier.
(We may refactor out the container later as we strip out Backbone, but for now it helps us get started quickly.)
<div id="react-root" class="container" ></div>
React Routing using React HashRouter
Next lets get some basic navigation routing and see some basic components load. Our Bootstrap App uses hash paths, like /app#login, /app#account, so we'll use HashRouter from React Router DOM
$ npm install --save react-router-dom
Lets create two basic React Components and wire them into our App.js with a HashRouter. We are using Hashrouter because our app uses hash paths:
- /app#login
- /app#register
- /app#account/me
- /app#install/me
- ...etc
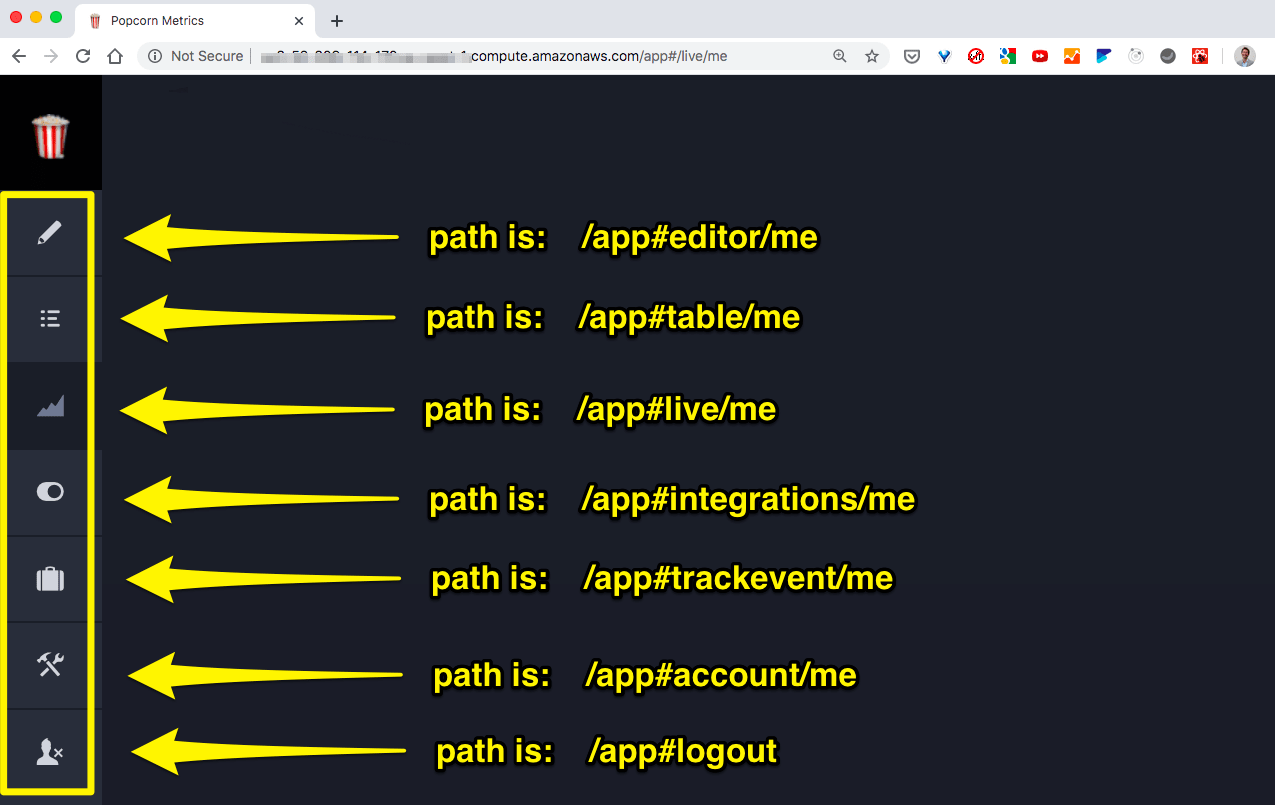
So, let's set up our React app to follow the existing paths used by our Back bone app.
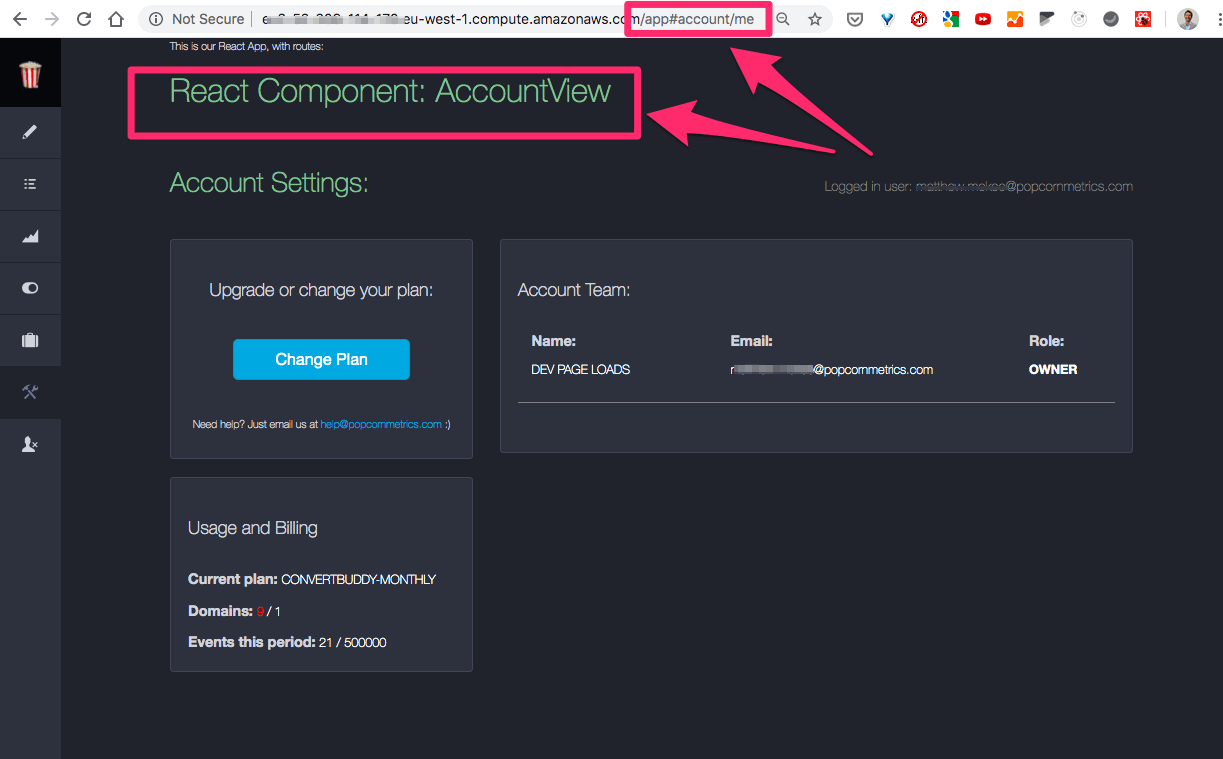
React Component 1: AccountView.js
import React from "react";

function AccountView () {
    return (
            <div><h1>React Component: AccountView </h1></div>
    );
}

export default AccountView;
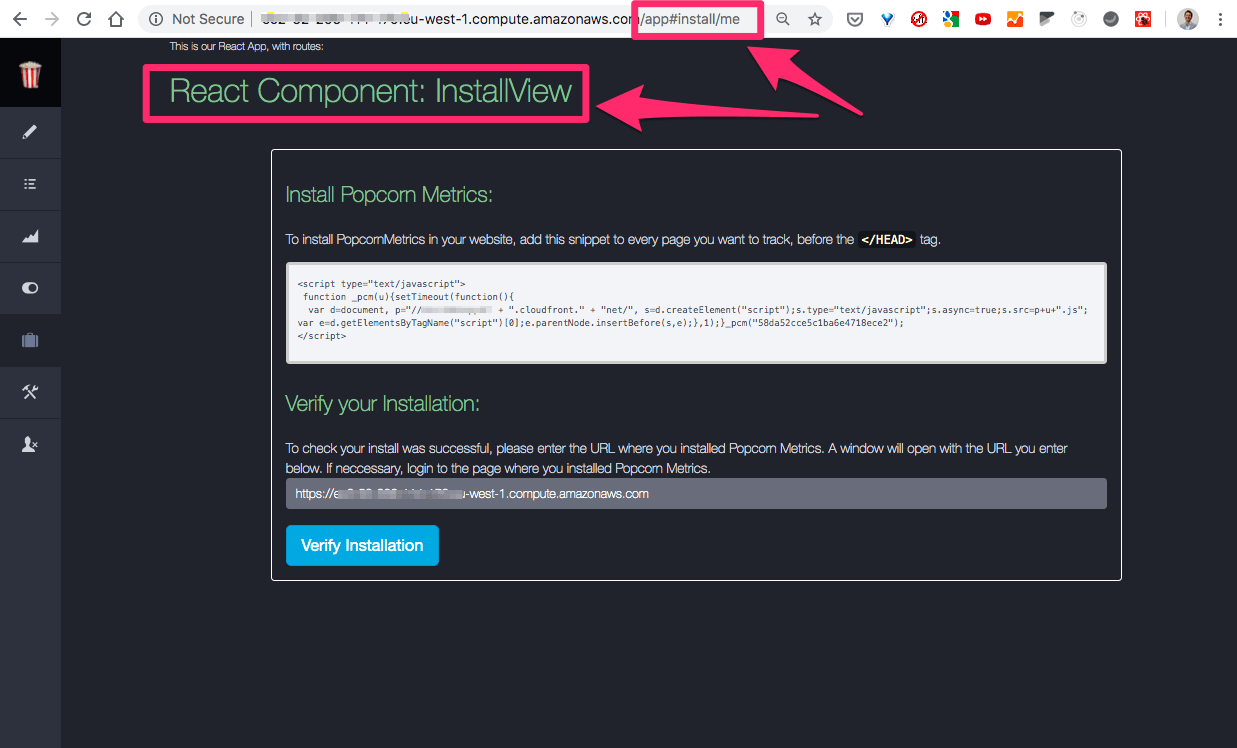
React Component 2: InstallView.js
import React from "react";

function InstallView () {
    return (
            <div><h1>React Component: InstallView </h1></div>
    );
}

export default InstallView;
React App: App.js - IMPORTANT
Our main App component is where we will add all our routes.
We can start with two simple components to verify that the correct React component renders above the Bootstrap view for the correct path.
import React from "react";
import { HashRouter, Route } from "react-router-dom";

import InstallView from "./InstallView";
import AccountView from "./AccountView";

function App () {
    return (
       <div>
            This is our React App, with routes:
            <HashRouter hashType="noslash">
                <Route path="/install/me" component={InstallView} />
                <Route path="/account/me" component={AccountView} />
            </HashRouter>
       </div>
    );
}
export default App;
NOTE:
1. We use HashRouter to match our existing hash based routes.
2. HashRouter default adds a slash `/` after the hash `#` (i.e. `#/` )
We configure `hashType="noslash"` to give us **/app#{foo/bar}**.
Oherwise HashRouter would change our routes to **/app#/{foo/bar}** (note the `#/`)
Updated Index.js to point to our new App:
We delete the import of index.css because we are going to depend on the CSS provided by our existing Bootstrap app.
import React from 'react';
import ReactDOM from 'react-dom';

import App from './components/App';

console.log("Loading React App...");

ReactDOM.render(
    <App />,
  document.getElementById('react-root')
);

if (module.hot) {
    console.log("Accept hot module..");
    module.hot.accept();
}
Okay, now we can test our routes:
Here is a quick manual check: Load our app Backbone+React and naavigate to one of the two paths configured in our React App Component (App.js). Verify, as shown below that our component loads correctly and only for that path.
We'll also test routes that are not configured to verify our components do not load on other paths.
/app#install/me: VERIFY: Our component InstallView loads OK:
As shown below, for path /app#install/me, our InstallView React component has correctly been rendered.
/app#account/me: VERIFY: Our component AccountView loads OK:
Now test the other path configured in our React App Component (App.js).
As shown below, for path /app#account/me, our AccountView React component has correctly been rendered.
/app#integrations/me: VERIFY: No component for Paths Not in App:
Lastly lets verify our React Compponents d NOT load on other paths: Navigate to other links (I tested them all).
Below is one example, showing while the React App loaded but no component loaded for paths not in our main React App HashRouter config.
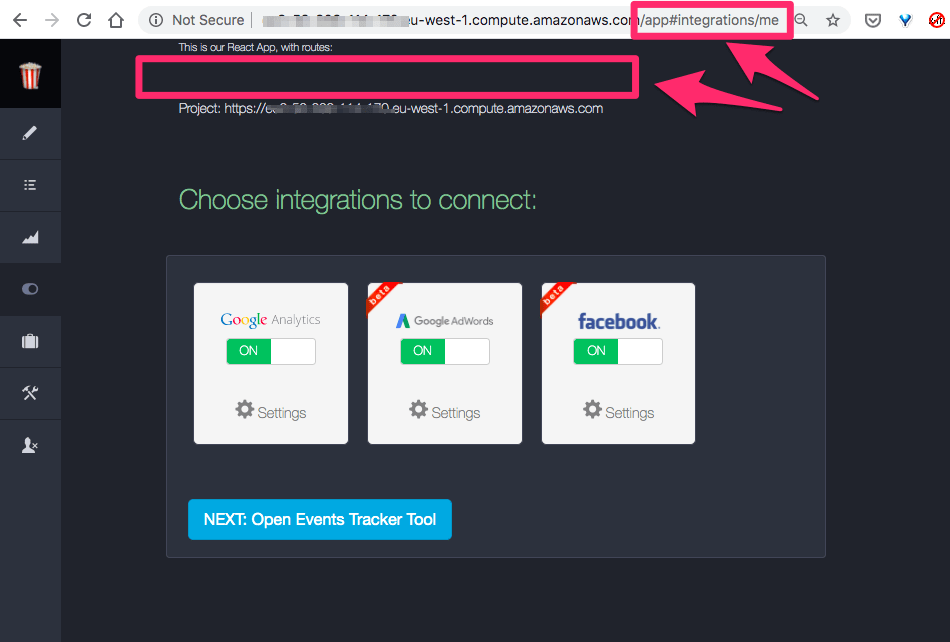
NOTE: I want to replace those tests with Automated tests.
Conclusion: ROUTES & Basic Components Rendering Next to Backbone Views
Great! At this point we have our routes set up. We've verified several components and that they only load when the path cnfigured in App.js is navigated in the app.
We've come a long way!
Now we can start to migrate the actual Backbone Views to React components.
Now lets Migrate the backbone View code into our react Components.
Now we have React playing nicely with our Bootstrap app. We have hot module refresh as we make changes, and we have our Routes set up for the first components.
Our next task is to migrate the logic, data and presentation in each Backbone View to the new corresponding React Component.
As we're going to get deep into code, lets start by setting up our TDD environment.
Lets set up our tests first, so we can now begine to use test Driven Development (TDD) n the Phase
Create React App comes with Jest testing already installed. We're going to use these tests for a solid TDD approach to the next part.
Here are our initial tests:
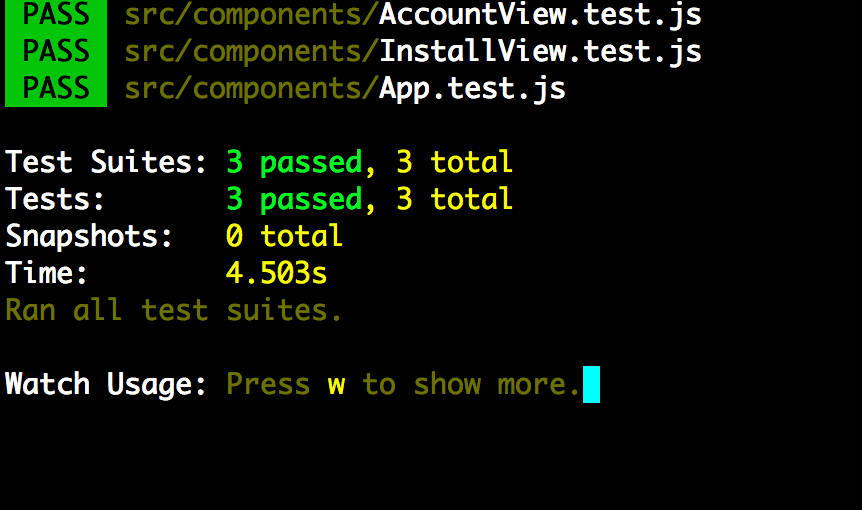
Test main App: App.test.js -- (smoke test)
Our test for the main App is a basic smoke test. We're only going to verify that the App loads OK and that referenced Components compile OK.
We'll use shallow test from enzyme.
$ npm install --save enzyme enzyme-adapter-react-16 react-test-renderer
Edit src/setupTests.js to configure Enzyme for Jest:
import { configure } from 'enzyme';
import Adapter from 'enzyme-adapter-react-16';
configure({ adapter: new Adapter() });
Then in our test we load the <App /> component via shallow.
import React from "react";
import ReactDOM from "react-dom";
import { shallow } from "enzyme";

import App from "./App";

test ('Smoke Test: App loads without crashing. ', () => {
        // shallow test ignores nested components.
        shallow( <App /> );
});
For more info on Enzyme, see: https://create-react-app.dev/docs/running-tests and https://enzymejs.github.io/enzyme/.
Test React Component 1: AccountView.test.js
import React from 'react';
import { render } from '@testing-library/react';

import AccountView from './AccountView';

test('renders basic AccountView text', () => {

  const { getByText } = render(<AccountView />);

  const text = getByText(/React Component: AccountView/i);
  expect(text).toBeInTheDocument();

});
Test React Component 2: InstalView.test.js
import React from 'react';
import { render } from '@testing-library/react';

import InstallView from './InstallView';

test('renders basic InstallView text', () => {

  const { getByText } = render(<InstallView />);

  const text1 = getByText(/React Component: InstallView/i);
  expect(text1).toBeInTheDocument();

});
To run our tests we use the following command:
$ npm run test
NEXT STEPS:
FURTHER READING:
https://webpack.js.org/guides/production/
https://webpack.js.org/guides/hot-module-replacement/
Migrate Backbone View code to React Components
In backbone, the presentation, logic and data models are separated. Thats a fundamental philosophy of the Backbone approch.
For our React Migration our first goal is to migrate the Template HTML to React render() methods, bring in the functions from the associated View, and locate the backboen Model data to React State (and later from State to Redux).
There are three functional blocks to migrate:
- Backbone HTML: HTML Template code to React
render()methods. - BackBone Views: Javascript files that implement the view logic to React Class methods.
- Backbone Model Data to React State (and then to Redux).
First we'll migrate the HTML templates, to get a "dumb" version of the component. Then we'll bring in the logic from the .js View files and the model data.
1. Migrating Backbone Template HTML to React Component Rendered JSX
At this stage we have basic React Component functions. Inside our React component were going to replace the return statement with the HTML from our Backbone template.
This is a simple copy/paste, then we'll tidy up the HTML to be valid JSX.
:
Replace return statement:
import React from "react";

function InstallView () {
    return (
            <div><h1>React Component: InstallView </h1></div>
    );
}

export default InstallView;
With our backbone HTML:
Wrap the template HTML in a <React.Fragment>. This makes it easy to define the limit of the copied code.
import React from "react";

function InstallView () {
    return (
        <React.Fragment>
           // {insert Backbone Template HTML here}
        <React.Fragment>
    );
}

export default InstallView;
As soon as you save the template, our tests will immediately give errors. This is nothing to worry about. In fact is a good thing. Backbone allowed us to create invalid HTML without complaint. React demands that our HTML is valid JSX.
Now we have our Jest tests running and watching our React code, any problems in our HTML show up immediatly.
You'll need to update your component tests to reflect the changes.
After you insert the HTML template code into each component, expect React to throw errors in your code:
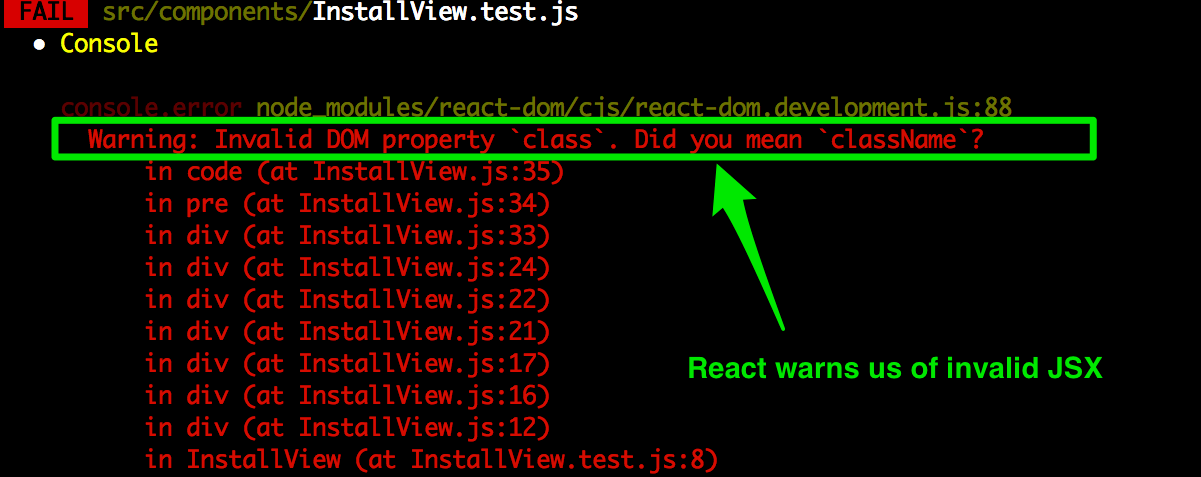
We needed to make the following changes for React valid JSX:
- Replace HTML comments:
<!-- I am a comment -->
... with javascript comments inside curly braces:
{/* I am a comment */}
(This works both for single-line and multi-line comments.0
- Replace all references to
classwithclassName:
$ sed -i 's/class=/className=/g' {filename}.js
- Replace all references to
tab-indexwithtabIndex:
$ sed -i 's/tabindex=/tabIndex=/g' {filename}.js
- Replace all references to
forwithhtmlFor:
$ sed -i 's/for=/htmlFor=/g' {filename}.js
-
Replace any inline styles with JSX inline styling:
e.g.
replacestyle="background-color:black;"
withstyle={{backgroundColor:"black"}}etc.
The inline style changes are the most time consuming because we had to perform eah one manually. I was happy to pay the price though, because they were a result of our previous process weakness in not extracting ALL our CSS to external files.
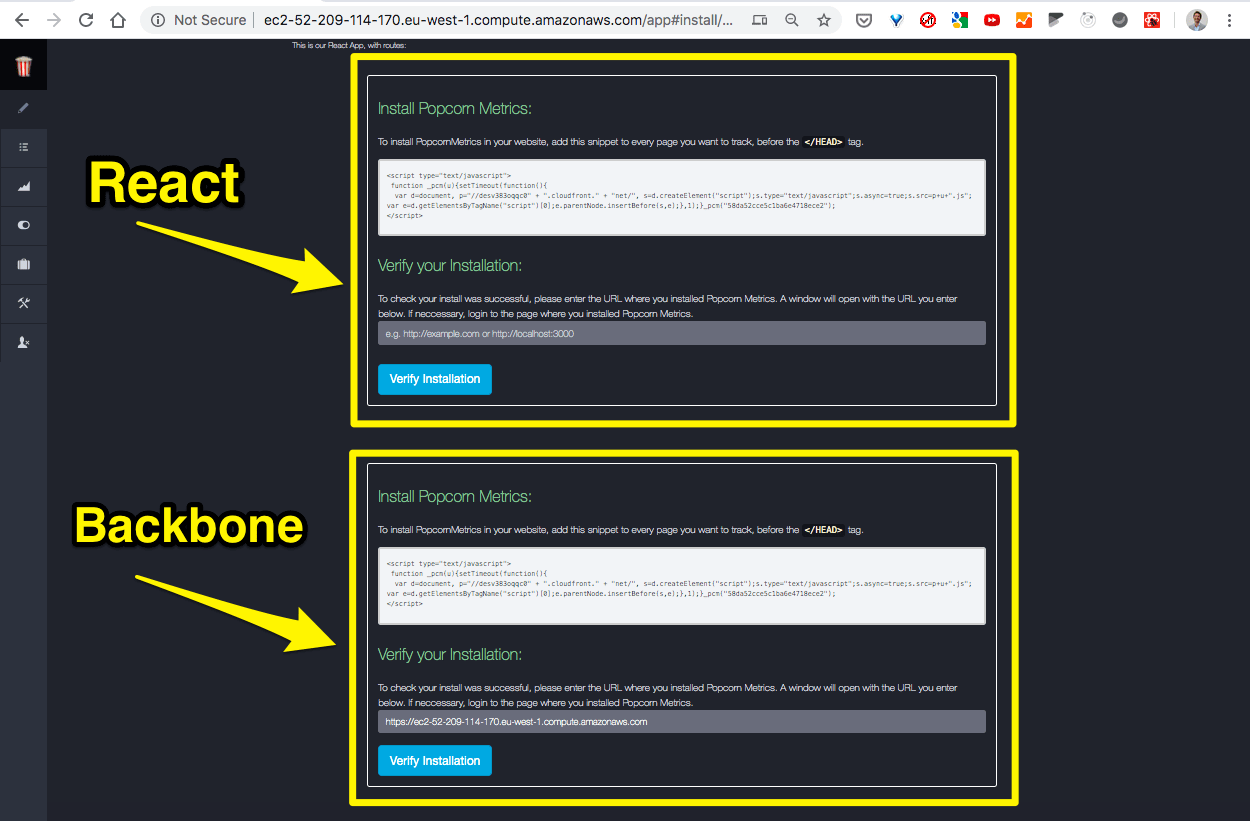
Great, we now we have our Backbone Template migrated successfully to React Copnent JSX. Below you can see our new React Component and our existing Backbone View rendering together:
SIDE NOTE(1):
=============
You *could* take this moment to make that extraction. I chose not to, in order to focus on the migration first.  But I have a TODO marked to return to these inline CSS styles and extract them later.
SIDE NOTE(2):
=============
We ran into an annoying problem when migrating our first template.  It contained a formatted section of javascript code wrappedin `<pre><code>{code}</code></pre>` blocks. If you need javascript code to render in JSX wrap your formatted code in ES2015 Template Literals. (see below)
How to Render formatted Javascript Code in JSX:
If you need javascript code to render in JSX, wrap your formatted code <pre> or <code> tags in ES2015 Template Literals as shown below:
<pre>
{`
function someJavascriptCode () {
   let val = "hello world";
   console.log (val);
`}
</pre>
Now we have the view rendering OK. Next we can start to implement the login from the Backbone View so our React component renders with state.
Migrating Backbone View Data into React JSX
here is a fundamental difference in philosophy between Backbone and React, and one more reason React has become so popular.
Here is a snippet of code to show the problem - can you see it??
Backbone HTML Template:
<span id="id-some-prop"></span>
Backbone View JS Code:
$("#id-some-prop").text(this.model.get("{some property}"));
Renders as:
<span id="id-some-prop">{some property}</span>
The philosophy of Backbone is to use the View JS code to write data into DOM elements defined in th HTML template as the view is rendered.
This separation of modules means a LOT of DOM lookups to fid the element and then populate data from the view code.
For me, this is a perfect example of why React makes this so much easier to write.
React JSX Code:
Our equivalent code in React (JSX) would look something like:
<span id="id-some-prop">{props.someProperty}</span>
React JSX Code (simplfied):
And we no longer need the id to identify the <span> element,
so we can write:
<span>{props.someProperty}</span>
React JSX Code (simplfied further):
In fact, the <span> element only exists as a placeholder to tell the Backbone JS View where in the Backbone HTML Template to insert the property.
So in our React JSX code we can delete the <span> entirely:
{state.someProperty}
Now, isn't that is ONE great reason to LOVE React?
All that boilerplate JS/HTML/DOM mapping code in Backbone just disappears in React and instead we insert the property value direct into our JSX exactly where we want it.
Beautiful!
For our migration, this definately means more work to change the code. Its not somethign we can automate. In my opinion, this is probably the hardest part of the Backbone to React migration process.
But the result is much cleaner lighter code which is easier to maintain.
Migrating the Backbone Model into React Component
Before we start to migrate across our existng Backbone View JS code, first we'll migrate the Model.
In Backbone, an external data model gets injected tothe View when it renders with its HTML template. The View Code is dependent on the model being available.
In Backbone, the Backbone Router is the central point where Views get rendered. In the Router, the Backbone View gets assigned a model and loaded. The component then performs any initialisation and renders.
Migrating Backbone Model Data:
A major question arises in how to handle Backbone Model data. If we depend on Backbone Models, our Vieew Code will migrate more easily as data references will not break. But we'll get a bunch of Backbone junk too.
Alternately we could just extract the attributes from the Backbone models. Or we could just get the data directly from the server inside our React App on load of our main
I think this has been the most difficult part so far.
Initially I had planned to just use the existing BackBone models in our migrated code, so I could lift the View JS code and place into our React app with minimal changes.
But...
It quickly became clear that I was building-in the undesired dependency on Backbone Model code (such as data access via model.get() calls to access model attributes).
This made tests harder to write because I had to mock the model.get() calls, which meant having to write a bunch of unneccessary Mocks with jest.fn() and associated code etc.
Ultimately I was just creating a whole lot of work to then undo later when we removed the Backbone Model code.
So, I took a MAJOR decision:
I decided to change direction and instead replace the Backbone Models with their underlying model attributes in pure JSON objects BEFORE migrating the Backbone View code.
The next section covers my approach.
How To Migrate our Backbone Models to our React App as JSON Objects
Our Backbone app uses JQuery to handle HTTP/XHR requests (GET/POST etc).
We aren't using JQuery in our React App. So, frst thing is to bypass the Backbone Models an JQuery call and make our own API calls direct to the server.
We'll relace JQuery $.ajax() calls with Axios. Axios is a promise based HTTP client for the browser and nodejs.
Install Axios:
$ npm install --save axios
Create Axios API instance at: src/api/xhrClient.js:
import axios from "axios";

const xhrClient = axios.create({
    baseURL: window.location.origin,
});

export { xhrClient };
Then we'll use our new xhrClient to make the same data calls when our React App loads as happens in our Backbone App:
Init Data in Backbone Router.js:
In our Backbone App, when a user logs in and is authenticated, we receive back initial data about the user account. Our Bacbbone Models are initialised and stored on the global window object.
   $.ajax("/account/authenticated",
       {
        method: "GET",
        success: function(response) {
            // Init app data in Backbone Models
            var accountModel = new Account(response);
            var activeDomain = new Domain();
            accountModel.set({activeDomainModel: activeDomain});
            accountModel.fetch();
            // Store account on global object:
            window.pcmApp.accountCache = accountModel;
            // Store user status
            router.authenticated = true;
        });
(NOTE: Lets ignore the fact that our initial app stores all this data in a global object. Our aim here is not to critique the existing Backbone App design, but to implement the same behaviour in React, and with better design. In our react app we'll avoid using the Global window obect to store App State.)
Getting Data in our React App.js:
NOTE:
Import our new XHR AP (axios):
import { xhrClient } from "../api/xhrClient";
Convert our Function Component to a Class:
Changing our App Component to a Class lets us use React lifecycle methods, specifically constructor():
class App extends React.Component {
Add a constructor to call this.initAppData() when our App loads to initialise data from the server.
constructor (props) {
    super(props);
    this.state = { model: null };
    this.initAppData();
}
New initData function to make the same call as or Backbone app, but using Axios, not JQuery.
Here we set the response data object direct to our model.
initAppData () {
    xhrClient.get("/account/authenticated")
        .then(function (response) {
            this.setState({ model : response.data });
        }.bind(this))
        .catch(function (error) {
            console.log("ERROR calling /account/authenticated", error);
        });
}
Mapping from Backbone Models to React State/Props
I decided to keep the notion of state.model so I could easily keep track and map our React code back to the original Backbone Model code during the migration.
With a state.model, mapping the Backbone View calls to model.get({property}) can be replaced in React with state.model.{property} (or props.model.{property} if using React Props).
Pass app state from the App component down to the components for each Route. For this I changed the Route component property to a render property so I could pass the App state down to the components.
NOTE: This is replicating the current design of our Backbone App, which uses a single global state. Though we are now removing it from the window object and aying it internal to the App State.
 <Route path="/install/me"
        render={() => <InstallView model={this.state.model} />} />
Here is the full listing of our new App.js
import React from "react";
import { HashRouter, Route } from "react-router-dom";

import InstallView from "./InstallView";
import AccountView from "./AccountView";
import { xhrClient } from "../api/xhrClient";

class App extends React.Component {

    constructor (props) {
        super(props);
        this.state = { accountModel: null };
        this.initAppData();
    }

    initAppData () {
        xhrClient.get("/account/authenticated")
            .then(function (response) {
                this.setState({ model : response.data });
            }.bind(this))
            .catch(function (error) {
                console.log("ERROR calling /account/authenticated", error);
            });
    }

   render () {
        return (
          <div>
            This is our React App, with routes:
            <HashRouter hashType="noslash">
                <Route path="/install/me"
                       render={() => <InstallView accountModel={this.state.accountModel} />} />
                <Route path="/account/me"
                        render={() => <AccountView accountModel={this.state.accountModel} />} />
            </HashRouter>
          </div>
        );
    }

}

export default App;
Then in our component, we'll use react Props to access the model.
Update our React Component to use Props
Now we can update our React child components to use React Props.
Below you can see we added (props) to the function signature.
We can now replace Backbone style model.get() calls like this:
this.model.get("activeDomainModel").attributes._id
With React Props like this:
props.accountModel.activeDomainId
to access the data.
Also, now we have state in our Props, we can update the component to return a Loading... message until the App state has loaded and passed into our component.
(NOTE: I omitted the JSX code below for clarity).
import React from "react";

function InstallView (props) {

    if (!props.accountModel) {
        return (<div> Loading... </div>);
    }

    return (
        <React.Fragment>
            { ... JSX ... }

            /* Use props.accountModel to get data
                Replaces Backbone View JS code:
                e.g. this.model.get("activeDomainModel").attributes._id
            */
            {props.accountModel.activeDomainId}

            { ... JSX ... }
        <React.Fragment>
    );
}

export default InstallView;
Migrating the Backbone View Code & Events Handling into React
Now we have data initialisig from the server via axios XHR/HTTP requests, we can begin to map in our Backbone View JS code.
Our backbone View has the following main parts:
- Lifecycle Method: initialize
- Lifecycle Method: render
- Event handlers
Lets deal with each in turn:
1. Lifecycle Method: initialize
Our existing Backbone View initialize method does a few things:
- Bind the model and render
- Handle initial JQuery hide of elements
- Get view speciffc data
initialize: function() {

   this.model.bind('change', this.render, this);
   $("#id-snippet-v2-3").hide();
   $("#id-snippet-pre-v2-3").hide();


   var that = this;
   $.get('/activeDomain/me', function(data) {
       var domain = new Domain (data);
       that.model.set({activeDomainModel: domain}, {silent:false});
    });

},
Our equivalent in our React Component will:
- Bind the model and render - React: NOT NEEDED
- Handle initial hide elements - React: Set style={{display:"none"}} in JSX , remove id attributes from these elements in JSX
<div style={{paddingTop: "15px", display: "none"}} >
- Get view specific data - React: Use Axios to get data
Lets now make our Component be a Class so we can use React Lifecycle method constructor() to initialise our data on component load. This is the equivalent to the Backbone initialize() method.
Below you can see we import our Axios xhrClient:
import { xhrClient } from "../api/xhrClient";
Change our Component to be a Class:
class InstallView extends React.Component {
Add a function to get data from the server (same call as our Bacbbone View):
initActiveDomainModel () {

    xhrClient.get("/activeDomain/me")
        .then(function (response) {
            this.setState({ activeDomainModel : response.data });
        }.bind(this))
        .catch(function (error) {
            console.log("ERROR calling /activeDomain/me", error);
        });
}
Add the constructor() and componentDidMount() React Lifecycle methods, to initialise state and call our initActiveDomainModel() method:
constructor (props) {
    super(props);
    this.initActiveDomainModel.bind(this);

    this.state = { activeDomainModel : null };
}

componentDidMount() {
    this.initActiveDomainModel();
}
Lastly, our Class Component must implement Reacts render() method:
render () {
    return (
        <React.Fragment>
            { ... JSX ... }
        <React.Fragment>
    );
}
Here is the full React Class Component code listing (minus the JSX for clarity):
import React from "react";

import { xhrClient } from "../api/xhrClient";

class InstallView extends React.Component {

    constructor (props) {
        super(props);
        this.initActiveDomainModel.bind(this);

        this.state = { activeDomainModel : null };
        this.initActiveDomainModel();
    }

    initActiveDomainModel () {

        xhrClient.get("/activeDomain/me")
            .then(function (response) {
                this.setState({ activeDomainModel : response.data });
            }.bind(this))
            .catch(function (error) {
                console.log("ERROR calling /activeDomain/me", error);
            });
    }

    render () {
        return (
            <React.Fragment>
                { ... JSX ... }
            <React.Fragment>
        );
    }

}

export default InstallView;
2. Migrate Backbone View.render() Method in React Component
Now we have our component initialization migrated, lets migrate the render method:
I can't blame Backbone for this, but as I look at this Backbone View render() method, it looks like over time more and more logic has been stuffed into it.
As we migrate, we'll break this into smaller parts and in parallel we'll create tests for each part. I can't help thinking that React is leading us down a path of cleaner more modular code. That said, in its defence, much of this Backbone code was written on a basis of getting a working "Minimal Viable Product" to market in the least amoun of time. The problem is we never went back later to refactor.
Anyways, let jump in and see ho we're goingg to attack th migration of this ugly code into React. I'll handle each part of code where it can be broken into parts. We're getting deep into the weeds here. If you want to skip past this, that fine, but I hope to give you an insight into my thinking as I approach this migration.
Here is our Backbone View render() method:
render: function() {

   // ignoreModelChangesFromOtherViewsOrRouter
   if (window.location.hash !== "#install/me") {
       return;
   }

   var DOMAIN_UNVERIFIED = "My New Project";

   $(this.el).html(_.template(trackEventTemplate,this.model.toJSON()));
   $("#error").hide();
   $("#error").text("");

   if (this.model.has("activeDomainModel")) {
       var activeDomainUrl = this.model.get("activeDomainModel").attributes.domain;
       if ( activeDomainUrl !== DOMAIN_UNVERIFIED ) {
           $('#id-verify-domain-input').val(activeDomainUrl);
       }

       if (this.model.get("libVersion") === "v2.3") {
           $("#id-snippet-v2-3").show();
           $("#id-snippet-pre-v2-3").hide();
       }
       else {
           $("#id-snippet-pre-v2-3").show();
           $("#id-snippet-v2-3").hide();
       }
   }

   return this;
}
Okay, lets break this down to see what work is needed:
The following code is because the Backboen Model is shared across multiple views. By default, if the model updates this view's render() method would be called.
In our React app, our Router takes care of rendering the correct Component for the given path. So I think we can ignore this code:
// ignoreModelChangesFromOtherViewsOrRouter
if (window.location.hash !== "#install/me") {
   return;
}
Next, we can copy the following var direct to our component as a const:
var DOMAIN_UNVERIFIED = "My New Project";
Next, we can ignore the following as its Backbone specific boilerlate code to merge the HTML Template an the View:
$(this.el).html(_.template(installTemplate,this.model.toJSON()));
Next we have some basic code to clear any displayed errors. For these we'll move to a function in our React component and embed within the JSX (see after).
$("#error").hide();
$("#error").text("");
Here is the equivalent code migrated into our React Component's JSX:
In our JSX we have:
<p className="error text-danger" id="error" style={{display: "block"}}></p>
Lets now set the display style and the content via state & functions:
In our constructor, lets init our error message:
this.state = { activeDomainModel : null,
               error : null
              };
Lets then create a function to manage display of errors:
errorStyle () {
    if (this.state.error) {
        return {display: "block"};
    }
    return {display: "none"}
}
And call that functon in our JSX:
<p className="error text-danger" id="error" style={this.errorStyle()}></p>
Lets then create a function to manage display of error message:
errorMessage () {
    if (this.state.error) {
        return error;
    }
    return "";
}
And call that functon in our JSX:
<p className="error text-danger" id="error" style={this.errorStyle()}>
    {this.errorMessage()}
</p>
And in our Jest test:
test ('Renders no error message', () => {

    // ACT:
    const { getByTestId } = render(<InstallView accountModel = {accountModel} />);

    //ASSERT:
    expect(getByTestId('error')).toBeEmpty()
});
NOTE: Our migrated Backbone HTML still has existing id attributes on elements so the Bacbone View code can manipulate. To reuse these ids in out test, we can use getByTestId() to use existing element ids by changeng from default attribute data-testid to id:
configure({ testIdAttribute: 'id' });
SEE: Configure data-testid for React Testing Library
Next we have some control logic. This also can be moved to a function called in our JSX (or direct in our JSX) (see after):
if (this.model.has("activeDomainModel")) {
   var activeDomainUrl = this.model.get("activeDomainModel").attributes.domain;
   if ( activeDomainUrl !== DOMAIN_UNVERIFIED ) {
       $('#id-verify-domain-input').val(activeDomainUrl);
   }

    if (this.model.get("libVersion") === "v2.3") {
       $("#id-snippet-v2-3").show();
       $("#id-snippet-pre-v2-3").hide();
   }
   else {
       $("#id-snippet-pre-v2-3").show();
       $("#id-snippet-v2-3").hide();
   }
}
Here is the equivalent code migrated into our React Component's JSX:
renderActiveDomainScriptStylePartial (showV23) {
    const version = this.props.accountModel.libVersion;
    let style =  {paddingTop: "15px", display: "none"};

    if (( showV23 && version === 'v2.3') || (!showV23 && version !== 'v2.3')) {
        style.display = "block";
    }
    return style;
}
and in our JSX:
{/* OLD SNIPPET TEMPLATE Pre V2.3 */}
<div style={this.renderActiveDomainScriptStylePartial(false) } id="id-snippet-pre-v2-3">
     ...
</div>
and:
{/* NEW SNIPPET TEMPLATE: V2.3 */}
<div style={this.renderActiveDomainScriptStylePartial(true) } id="id-snippet-v2-3" >
And our tests:
test ( 'renders only script version pre- 2.3', () => {
    //ARRANGE:
    accountModel.libVersion = "v2.2";

    //ACT:
    const { getByTestId } = render ( <InstallView accountModel = {accountModel}/> );

    //ASSERT:
    expect(getByTestId("id-snippet-pre-v2-3")).toHaveStyle('display: block');
    expect(getByTestId("id-snippet-v2-3")).toHaveStyle('display: none');
});


test ( 'renders only script version 2.3', () => {
    //ARRANGE:
    accountModel.libVersion = "v2.3";

    //ACT:
    const { getByTestId } = render ( <InstallView accountModel = {accountModel}/> );

    //ASSERT
    expect(getByTestId("id-snippet-pre-v2-3")).toHaveStyle('display: none');
    expect(getByTestId("id-snippet-v2-3")).toHaveStyle('display: block');
});
SIDEBAR: Installing Jest and React Testing Library
We have migrated to React by using create-react-app, which means Jest (and React Testing Library) are installed by default. If you prefer to a custom React setup, you will need to install and set up Jest and React Testing Library for your project.
SIDEBAR: So good to Build with TDD
I remember building some of this Backbone code back about 5 years ago. We were still moving fast, breaking things, writing code and manually testing in the browser and shipping. We released often and rarely broke things in Production. But we never took the time to set up a test infrastructure for Backbone components.
This refactoring to React is different. Now we have legacy product and our migrated code needs to replcate features exactly. Going through this migration of Backbone View code, and writing the tests first is giving me incredible confidence in the success of the migration. Plus the tests are building a stability to the codebase we never had before.
Later, when we migrate from plain React State to Redux, we'll have these tests so we'll know if we break anything. WOW! That is exciting. Its liberating!
SIDEBAR: Feature Unit Testing with React Testing Tools
Using tests that mimic the user experience focuses tests on the behaviour of a cmponnt rather than the implementation.
ALSO SEE for comment: https://medium.com/@boyney123/my-experience-moving-from-enzyme-to-react-testing-library-5ac65d992ce
Testing: Mocking AXOIS Rest Calls with Jest, React Testing Library and MSW
Our component, on initialization makes a server call to get activeDomian data. It then sets that data as Stae within the component.
For our unit testig we need that data to be present in the coponent, but do not want to force state directly.
In fact, React Testing Library pushes us away from manipulating state in our compnent tests so we can focus on teh behaviour and not the internals. So, we need a way to Mock the REST calls (GET/POST etc) in our unit tests.
Enter Mock Service Worker!
As the documentatin says, Mock Service Worker(MSW) is an API mocking library for browser and Node.
Install msw:
$ npm install --save-dev msw
Update our test:
Import the lib:
import { rest } from 'msw';
import { setupServer } from 'msw/node';
Setup the "Server" (define API calls to mock and response data. Set dalay for real async experience)
const baseURL = window.location.origin;

const mockServer = setupServer(
  rest.get(baseURL + '/activeDomain/me', (req, res, ctx) => {
    return res(
      ctx.delay(1500),
      ctx.status(202, 'Mocked status'),
      ctx.json({
        domain: 'https://mocked.responsedata.com',
      }),
    )
  }),
);
// Enable API mocking before/after tests. (Listens for network calls):
// Enable API mocking before tests.
beforeAll(() => mockServer.listen())

// Reset any runtime request handlers we may add during the tests.
afterEach(() => mockServer.resetHandlers())

// Disable API mocking after the tests are done.
afterAll(() => mockServer.close())
Then our test function (note use of async, await and findBy*):
test ('Renders active domain URL if has been saved', async () => {

    //ACT
    const { getByDisplayValue, findByDisplayValue } = render( < InstallView accountModel = {accountModel} /> );

    // NOTE: await findBy* pattern:
    // ===========================
    // Use async with findBy* helpers to wait for
    // our AXIOS Mocked calls to return and
    // update state and rerender component.
    // So, we await the populated value, not
    // the element itself (because it would
    // return immediately).
    // Alternately, you could use:
    //  await waitFor (() => getBy* )
    //   or:
    //  await waitForElement (() => getBy* )
    let input = await findByDisplayValue(/mocked.responsedata.com/i);

    //ASSERT
    expect( input ).toHaveValue('https://mocked.responsedata.com');
});
Now we have our test, we can we add a new function our React Component to extract the value fro state populated by the call to axios.get():
renderActiveDomainUrl () {
    const { activeDomainModel } = this.state;
    let url = "";
    if (activeDomainModel && (activeDomainModel.domain !== DOMAIN_UNVERIFIED) ) {
        url = activeDomainModel.domain;
    }
    return url;
}
And in our JSX we render to the React defaultValue property:
<input type="url" className="form-control" id="id-verify-domain-input"
       placeholder="e.g. http://example.com or http://localhost:3000"
       style={{paddingLeft:"10px"}} tabIndex="1" required
       defaultValue={this.renderActiveDomainUrl()} />
Or better, the id="" is not needed any longer. It is a hangover from our Backbone implementation, use by the View to find and update DOM elements. Lets renove it to keep our code cleaner. This will also allow our React component to render together with our Backbone View while we are migrating without the Backbone View finding the DOM element in the React component.
<input type="url" className="form-control"
       placeholder="e.g. http://example.com or http://localhost:3000"
       style={{paddingLeft:"10px"}} tabIndex="1" required
       defaultValue={this.renderActiveDomainUrl()} />
SIDEBAR: Some Observances in Testing
A number f concerns have appeared in writing the tests for this component. Firstly, I have become very aware that in Backbone, given that so much View code is used to query for DOM objects and control their screen visibility.
That leads a developer into writing code that duplicates a feature and then just showing or hiding as neccessary.
Its a bad practice, firstly because it ceate two code paths, then because it needs logic to show/hide different DOM elements. This is very cear in the case where we had one <DIV> to display a code snippet. When we needed to display a new snippet, instead of reusing and just updating the content, we had preferred to duplicate. And why? Simple, previously we did not have tests. So, instead of risking breaking existing code, we opted to just "add more code".
In this migration from Backbone to React I am hugely tempted to also refactor to use a single code block. Because now we have tests that posssible.
A second observation is that, the test I have written specifically tests for the show/hide behaviour which is entirely implementation dependent, making brittle tests that will fail if I refactor.
So, that acts as a reminder to write React Component tests that are as close to the user experience as possible.
For example, take these assertions (below) that test which <DIV> is visible. They would be better tests if they asserted that the correct text was rendered on screen.
Assert desired text IS rendered:
  //ASSERT
    expect(getByTestId("id-snippet-pre-v2-3")).toHaveStyle('display: none');
    expect(getByTestId("id-snippet-v2-3")).toHaveStyle('display: block');
Lets rewrite those tests to be user experience based, using getByText to select the displayed text:
    //ASSERT
    expect( getByText(/desv383oqqc0/) ).toHaveTextContent('getTime().toString().slice(0,7)');
and assert desired text is NOT rendered:
    //ASSERT
    expect( getByText(/desv383oqqc0/) ).not.toHaveTextContent('getTime().toString().slice(0,7)');
That as a bit of a sidetrack, but an important one.
Our React Component now has less code, less template, and user experience tests. Our code is not dependent on id attributes or css to show/hide DOM elements. Our migrated React code is cleaner and easier to maintain.
At this point our Backbone View's render() method has been migrated,
As I look at this component I am tempted to refactor and break it into two components. This is a constant temptation on revisiting code. For now I will resist, but when the component has been fully refactored to React I may then split the React component into two components.
To complete this Backbone View migration, the last outstanding task is to migrate the event handlers.
Migrating User Interaction Event Handlers from Backbone to React
There are series of steps needed to migrate each click handler from Backbone to React. In general we'll do the following:
- replace the BAckbone "events" defiition with a clickHandler direct on the button in JSX, and
- port the View function (and related functions) to our React Component, making changes to conform to React (as we'll show as this secion evolves).
Our backbone View has one event handler, as below:
events: {
    "click #check-script"   : "checkScript"
},

checkScript: function () {
   var url = $("#id-verify-domain-input").val();
   var that = this;
   getFullUrl(url, function(url) {
       url+= '?checkpcminstallation=true';
       var newTab = window.open(url, "popupWindow", "width=600,height=600,scrollbars=yes");
       if (newTab) {
           window.setTimeout(function() {newTab.close();}, 9000);
       }
       checkInstallation(that, that.model.get("activeDomainModel").get("_id"));
   });
}
and HTML:
<button id="check-script" class="btn btn-lg btn-primary"
        type="button" tabindex="2">
    Verify Installation
</button>
We'll migrate the click handler to our Reat Component by adding an onClick() event handler inour JSX and a function to implement checkScript() from the View. Initially we'll copy&paste the function direct to our component, then we'll update as needed.
In our React Component we'll add a click handler to our <button> element to call function checkScript(), and we no longer need the id attribute so we can remove that:
<button id="check-script" class="btn btn-lg btn-primary"
        type="button" tabindex="2"
        onClick={this.checkScript()}>
    Verify Installation
</button>
Then we'll copy checkScript from the Backbone view (below), and then step through to make the changes needed to migrate to React:
checkScript = () => {
   var url = $("#id-verify-domain-input").val();
   var that = this;
   getFullUrl(url, function(url) {
       url+= '?checkpcminstallation=true';
       var newTab = window.open(url, "popupWindow", "width=600,height=600,scrollbars=yes");
       if (newTab) {
           window.setTimeout(function() {newTab.close();}, 9000);
       }
       checkInstallation(that, that.model.get("activeDomainModel").get("_id"));
   });
}
Now we'll go through step by step:
- there are a number of referenced functions, so we'll port them,
- there is data extracted from the DOM, sp instead we'll handle that via Reat state,
- there are references to to model, s we'll map that to our state
- and we'll apply the same steps as we follow the tree of referenced functions.
First lets take that data value being read from input. In React our state isnt stored in the DOM, so we'll want to read that with an onChange event handler.
   var url = $("#id-verify-domain-input").val();
}
Lets add the changeHandler in our JSX:
 <input  type="url" className="form-control"
    placeholder="e.g. http://example.com or http://localhost:3000"
    style={{paddingLeft:"10px"}}
    tabIndex="1" required
    defaultValue={this.renderActiveDomainUrl()}
    onChange={(e) => {this.handleChangeUrl(e);}}
/>
And in our Component we'll initialise checkUrl state:
constructor (props) {
    ...
    this.state = {
        ...
        checkUrl: ""
    };
}


handleChangeUrl = (evt) => {
    this.setState({ checkUrl : evt.target.value});
}
SIDEBAR: A Fundamental Difference between Backbone and React
So far this all seems fine. We've migrated the technology, got our component rendering and tests running. It seems like the migration is easy. Up to this point I would agree. But we've now reahed the hard part.
"The hard part??" you ask. "Yes", I say, because now we are trying to take code written for a Backbone view and move it to React. The differences are formidable. First, React is written to inline data in our JSX and render as state changes. Our Backbone app (or at least our implementation) has these changes managed in the view, so as the model (i.e. state) changes, our view has to find th element (typically using jQuery) and then controls the data displayed as well as the element visibility.
Here's an example of what I mean:
Take this network XHR call that includes error handling:
In Backbone it looks like this:
var getFullUrl = function (url, callback) {
     if (url!== undefined && url !== "") {
         $("#error").slideUp();
         if (url !== false && url) {
             if (url.indexOf("http") === -1 && url.indexOf("https") ===-1) {
                 url = "http://" + url;
             };
             url = url.charAt(url.length-1) == "/" ? url.slice(0,-1) : url;
         }
         callback(url);
     }
     else {
         $("#error").text("Please enter a domain (e.g.http://www.yourwebsite.com)");
         $("#error").slideDown();
         return;
     }
 };
Notice how in logic we manage the error element:
$("#error").slideUp();
...
$("#error").text("Please enter.... ");
...
$("#error").slideDown();
In our React compponent we cannot simply copy/paste this code. We need to chaneg it so the error "state" is set in the failure situation. And we also need state to manage the visibility of the error element (those slideUp()/slideDown() animation calls).
As to animations? By using jQuery in Backbone we fell for the temptation to use animations where a simple show/hide would have sufficed.
Lets deal with the error state and show/hide. Then we can think about those jQuery animations in React.
Lastly, we do not have tests for our Backbone views. This is bad, clearly. Though I also note that I am writing Jest/Test-Library React component tests. I now see that is insufficient.
Why?
Because right now I am regretting not having integration tests that would pass regardless of the build technology. And while the React tests are being written using the Testing Library principle of "The more your tests resemble the way your software is used, the more confidence they can give you." it is also true that these tests are written for a React implmentation.
So what?
So what because, at some future time, when react has been supplanted by a newer shinier technology, and we then migrate again to this Shiny New Technology, our React tests will be of no value. For, unless there exists some tool to automate our React tests to Shiny New Technolog, we will need to manually rewrite them too (or throw them out with the old React code).
So, there is a lesson here: unit tests good, but we ALSO MUST have integration tests that are implementation agnostic.
Moving on...
How to Migrate Backbone View Logic into our React Component
Oh my. I just copy/pasted all the referenced functions from the Bootstrap View to this React Component.
Its aweful. We've already seen the difference for the sidebar example of error handling. But theres more. Much more.
Here is how I feel at this exact moment:
"Its horrible. There are 6 functions and 100+ lines of code. Including callbacks, recursive funcins and network calls. I can't just pass this code through. It wudl be a nigtare for maintenance. I'm going to have to do serious refactoring here. I wish we had integration tests. Shall I stp now and write those integration tests? What will that cost i additinal time and cost to this project? How can I do that most efficiently? etc"
OK, man up. Lets take this one step at a time.
Here is my plan of action:
List of tasks for each React Component:
- write component tests for each part of the logic I migrate (using Test Driven Development (TDD)
- refactor callbacks to use Async/Promises
- refactor jQuery fetch calls to use Axios
- remove all jQuery code that ties Backbone Views to their Templates
- replace DOM lookups by id to inline JSX properties and state
- refactor to try and simplify the recursive parts of the code
- replace any jQuery data access from the DOM with React State
I'll also need to think about how to get integration tests that ass for Backbone implementation, and then see tht they also ass for React.
I won't put all the code here, it would be too much. So, I'm going to jump into the code and come back here when I am done. Then'll come back here to update you on the main learnings.
UPDATE:
The greatest challenge I am experiencing in this phase of migrating actual existing code logic from Backbone to React lies in writing Tests. This is because the Backbone code was written without tests and I am attempting to write the Unit Tests in Jest/React-Testing-Library for my React components as I bring in the code from Backbone.
I am facing a huge difficulty. I have backbone View logic written with nested callacks (hell is not a strong enough word!). WHat is making this code incredibly hard to test is that we have nested XHR/Fetch calls. Depending on the result of one call we make a subsequent Fetch. Writing Unit Tests for that is extremely difficult. I have been fighting for several days to write tests for the existing logic. How do I write a test that awaits th result of a third nested fetch call?
I have decided to change approach.
It is clear that I am trying to test too much in my Unit Tests.
So, I need to take a step back and consider a better approach:
- first: integration tests, to verify high level behaviour
- second: smaller more focuse uni tests
- third: I willneed to refactor the code significantly to become testable, because in its curent form of chained XHR/Fetch calls.
This third part, the major refactoring, is going t be the most work in the migration. It is hard to separate how much of this relates to the difference between React and Backbone.
Why we never wrote Unit Tests for our backbone code.
We didn't write unit tests for Backbone.
And here is a painful truth...
If we had written unit tests, we would need to migrate those tests, for example, into Jest and React-Testing-Library/Enzyme etc. But the tests would have guided the code changes. And the code would have been more testable.
Why did we decide to not write tests?
We were building a startup! We were following Lean Startup philosophy. We were building a Minimle Viable Product. We were "moving fast, breaking things".
Speed was hugely important. We were a small focused team. We made numerous small releases daily. We rarely made large releases. We inched forward. Small changes allowed us to catch/rollback/fix bugs quickly.
And it worked, at least in teh begining. But, over time the code complexity increases, and testing therefore becomes harder. Technical debt builds.
And Unit Tests are meaningful when written at the same time as the code. It is hard to go back and add tests later. At some point you have to pay a price.
Now is the time to pay that price.
So, lets go forward with End-to-End integration tests and refactor our code for testability.
Integration testing for React
At present, there are a number of Javascript testing frameworks which are popular. The main candidates include:
- Selenium
- Puppeteer
- Cypressio
- TestCafe
- WebDriver
Selenim has been around for a long ime. I used it back when I worked at Wiley Online Library. I liked it. But it uses Java. My language of choice is Javascript so I will seek a JS based testing framework.
Javascript End-to-End Test Framework Research
From my research below (and including: this post and google trends: Puppeteer vs cypressio vs testcafe and google trends: Puppeteer vs cypressio vs testcafe vs webdriver)
NPM Downloads:
- Cypress.io weekly downloads 1,285,706 (trend up) - published
8 days ago - Puppeteer weekly downloads 1,491,946 (trend flat) - published
2 days ago - TestCafe weekly downloads 182,818 (trend flat) - published
1 day ago - WebDriver weekly downloads 639,855 (trend up) - published
2 days ago - Selenium weekly downloads 1,648,955 (trend flat) - published
4 months ago
Cypress and Puppeteer are popular NPM packages. Cypress is increasingly popular. Webdriver is slower and requires more setup. TestCafe is fast and offers cross-browser support, but significantly less popular by weekly NPM downloads. Cross-browser support is not our primary requirement. 88% of our users use Chrome or Firefox browser.
I see Cypress as a framework that is fast and easy to get End to End tests up and running. It is growing in popularity, and a technology that is ascending tends to stay current and be well maintained. On this basis it beats WebDriver. Cypress includes async waiting for elements, which I like in our React Unit Tests.
That said, Cypress has some limitations, such as access to other windows and iFrames (which in our app I know we use).
Puppeteer is more powerful (including managing tabs, iframes, network requests etc). Puppeteer is not a test automation solution so we'll pair it with somethng like Jest. If we can get enough testing from Ctpress all good. If we do need to test Tabs / iFrames, to handle those specific limitations, we'll use Puppeteer.
OK, thats our Test Framework decided. If we run into difficulties we can return to this decision.
For now, lets jump in to Cypress.io for some end to end testing reated to our component.
We'll aim to create tests for the Backbone implementation. Then switch to React and confirm tests still work.
UPDATE on React Testing Tools/Libraries
I just found NpmTrends.com. NpmTrends is like Google Trends, but shows graph coparisons based on Downloads of different NPM packages.
Here is the comparison trend for the past 2 years. (NOte by default the graphs display as last 6 months. Showing 2 years gives a clearer indication of recent trends.)
The graph shows clearly the popularity of Enzyme. It shows how React testing Library was growing but then fell away. The growing player seems to be Cypress.
Refactor Code for Testability
Once we have good End-To-End tests, we can then drop back to Refactoring the code aligned with Unit Tests. The End to End Cypress tests will give good confidence on our migration and refactoring.
- Avoiding Chained network calls
- Replace nested callbacks
- Break large components into smaller components
SIDEBAR: Learning notes on Migration in Action:
===============================================
Pulled in great amount of logic from Backbone View.

Major work to write tests using testing-library to validate success. Includes XHR/Fetch proxy in tests. Includes async waits for elements to be rendered.

Much work to switch from backbone 'show|hide' style coding to use React conditional rendering, so tests can validate cleanly on element presence rather than interpret a CSS style which is show|hide. Much work here. Much learning on how to migrate Backbone to React.

Being TDD in migration and writing tests forced simplification of code, replacing callbacks with Promises, and simplifying code structure, especially recursive calls.
Testing Axios Requests
One problem I wrestled with is when a component has pending Axios requests (GET/POST/PUT/DELETE/etc) when a Jest test completes.
When the test completes Jest will unmount the component, BUT.. if an Axois async request later comes back, with data, and we then try to update state on the unmounted component, you will see and error like this:
console.error node_modules/react-dom/cjs/react-dom.development.js:88
    Warning: Can't perform a React state update on an unmounted component. This is a no-op, but it indicates a memory leak in your application. To fix, cancel all subscriptions and asynchronous tasks in the componentWillUnmount method.
What is more disconcerting is that although the test may pass, this console warning undermines your confidence in your testing. ("If my tests are passing , why am I getting these warnings....???")
To get rid of this warning, we need to follow the advice given in the warning itself:
"cancel all ... asynchronous tasks in the componentWillUnmount method".
Fine. To cancel AXIOS calls is farly standard (see official Axios docs).
1. How to Cancel Axios Requests on Component Unmount
Setup Axios CancelToken source:
import axios from 'axios';

const CancelToken = axios.CancelToken;
const source = CancelToken.source();
Set a cancelToken for each AXIOS request:
axios.get("/some/data", {
    cancelToken: source.token
})
    .then( ... )
    ...
Call source.cancel when React component unmounts:
componentWillUnmount() {
    source.cancel("UNMOUNT: cancel pending AXIOS calls");
}
BUT..when you cancel the AXIOS request, Axios will throw an error.
So now, instead of WARNINGS in your test console log, you see errors appearing (if you log errors). Which again undermines confidence in the tests. ("If my tests are passing , why am I seeing these errors....???")
So, here's how to catch the Axios Error when cancel is called.
2. How to handle the Axios Error on Cancel
Here is how to handle Axios cancels correctly in react component using axios.isCancel(err) to differentiate between genuine errors that must be handled, and deliberate cancels when component unmounts:
axios.get(...)
    .then( ... )
    .catch(function (err) {
        if (!axios.isCancel(err)) {
            // handle error or
            throw err;
        }
        });
    });
Given fact that a cancel is deliberate and not an error, we are happy to simply ignore it. Equally, you could handle genuine errors in place, or rethrow them.
My thanks to Rob Wise for his post on Aborting Fetch Requests in React for his comments: "Since this is actually expected, we can safely ignore it. Make sure to re-throw if it’s not an AbortError, however, so you don’t swallow other errors accidentally." Also to Gaurav Singhal for his detailed post on All You Need to Know About Axios which is well worth a read.
With Axios Cancels working cleanly, our tests are now much easier to write. Also, the log is clean of unneccessary warning and logs which means our tests give more confidence when they run.
ESLint and Prettier: Adding Linting And Code Style
In writing our migrated React code and tests we want to ensure a consistent set of Code Standards and Code Style Format. The JS community has coalesced around ESLint for enforcing Code Standards. To make life easier, much of the work has been done for us by other companies (such as AirBnB) publishing their ESLint rules configuration.
An exhaustive source of the various ESLint configs and plugins, quality , launguages, frameworks, security (etc!) can be found here. Be warned: there are a TON of ways to leverage ESLint for quality and formatting. Prettier is also very popular for formatting, and in general it is recommended to use ESLint to enforce rules and leave the pretty formatting to Prettier (or an alternate). Havng code that "looks" consistent across all files makes it easier to read code.
Given there is so much variety around, we're going to start simple and then add more if/when there is a need.
So, here is a simple lint/format setup to get started quickly:
-
PRETTIER: We'll let Prettier take care of formatting.
-
ESLINT: We'll use ESLint to enforce code standards
-
ONCHANGE: We'll use NPM package onchange to run Prettier in realtime when we save code changes.
This is optional and there are alternates for integrated tools like VSCode. But, our team codes on remote Amazon EC2 instances using Emacs. There are alternates to onchange, including ESLint-Watch (ESW).
NOTE: I began using ESLint-Watch (ESW), with the intent to run Formatting and Linting on code changes, but ran into problems with the ESW process running repeatedly and maxing our CPU. I never got to the bottom of the problem, but we had ESW caling ESLint which then called Prettier all with --fix. I figured they we'rent playing well together, so I decided to unbundle and fallback to auto-formatting (with Prettier/onchange) when saving code changes and ESLinting as a Pre-Commit hook (with the optin for developers to manually run ESLint during development).
- HUSKY: We'll use Husky to enforce Pre-Commit and Pre-Push code quality (and testing). (An alternate woudl be Webpack EsLint-Loader to lint the code at build time, but I prefer to enforce our Linting Rules prior to comit to push the code quality down to the developer.
We'll start with a popular set of ESLint rules, like AirBnB or Standard configs. Later we may switch to a different config, but that will be an iteration. We'll also add in other plugns/rules for Jest, React, JSX etc as we go.
First I want to get the basic infrastructure in place.
SIDEBAR: My Preference to Develop on a EC2 instance
===================================================
Ever since I took Stanford University's renowned Startup Engineering Course, I have preferred to write code direct in a text editor on a remote EC2 instance. This is how our whole team has operated since 2013.

I like it because I can keep my MacBook clean and work across different projects on different EC2 instances without polluting my environment with global installs from different projects.

It also means I can drop my MacBook in the bath, buy a new one, login to my EC2 instance and carry on. No time wasted. No risk. No days wasted trying to setup a new machine.

Plus I can image an EC2 instance for a new team member to get them up and running super fast.
Installing And Setup:
Code Formatting:
Prettier is VERY popular, with almost 10 million downloads per week. Its a no brainer.
We'll use Prettier to format our code. Then we'll use onchange to watch for code changes and trigger Prettier.
Install Prettier:
$ npm install --save-dev --save-exact prettier
Create a .prettierignore file to tell Prettier what to ignore (based on our .gitignore file and excluded more folders and file types):
Sample .prettierignore file:
.env*
events
node_modules
build
build_webpack
public/dist_webpack
.DS_Store
# Emacs
*~
*#
.#*

server.*
start-dev.sh

*.log
*.csv
*.json
*.html
*.css

*.cert
*.csr
*.pem

public
public_variant
Auto Formatting With Pretter when we Save Changes:
Install onchange:
$ npm install --save-dev onchange
Then add the following script to package.json:
"scripts": {
    ...
    "prettier:watch" : "onchange '**/*.js' --exclude-path .prettierignore  -- prettier --write {{changed}}",
    ...
}
NOTE: We configured the --exclude-path to ignore everything we've configured Prettier to ignore.
Now we can run the following to let onchange watch for code changes on file save and trigger code formatting:
$ npm run prettier:watch
Lastly, lets add th following scripts to help developers run manual checks:
- "prettier:check" script to check all files have been formatted and
- "prettier:format" to apply Prettier to all files (useful if developer has been coding without our watch task. We'l also b able to add this as a pre-commit hook later.).
"scripts": {
    ...
    "prettier:watch" : "onchange '**/*.js' --exclude-path .prettierignore  -- prettier --write {{changed}}",
    "prettier:check" : "prettier --check src",
    "prettier:format" : "prettier --write src",
    ...
}
SIDE NOTE -- REFRESH EMACS BUFFER:
==================================
You may be using VSCode or nother IDE. For emacs to refresh the editor buffer to load changes made by ESint --fix, it is neccessary to add the following to emacs config **~/.emacs.d/init.el**:

(global-auto-revert-mode 1)
Linting:
Now we have Prettier in place to keep our code format, lets get ESLint in place. Remember, ESLint will be concerned with code quality.
First we'll install ESLint:
$ npm install --save-dev eslint
Init ESLint to create an eslint.confg file:
$ ./node_modules/.bin/eslint --init
Select: "To check syntax, find problems, and enforce code style"
Select: "JavaScript modules (import/export)"
Select: "React"
Select: "Typescript?" > "NO"
Select: "Toggle All" (Our React components will run in browser, but our jest test will run in NodeJS so I'd want to configure for both )
Select: "Use a popular style guide"
The choice then is:
Airbnb: https://github.com/airbnb/javascript
Standard: https://github.com/standard/standard
Google: https://github.com/google/eslint-config-google
Select: "Standard"
Select: "What format do you want your config file to be in?" > JSON"
The ESLint Init Tool wll now install the following:
- eslint-plugin-react@latest
- eslint-config-standard@latest
- eslint@>=6.2.2
- eslint-plugin-import@>=2.18.0
- eslint-plugin-node@>=9.1.0
- eslint-plugin-promise@>=4.2.1
- eslint-plugin-standard@>=4.0.0
Here is our generated ESLint Config File (.eslintrc.json):
{
    "env": {
        "browser": true,
        "es2020": true,
        "node": true
    },
    "extends": [
        "plugin:react/recommended",
        "standard"
    ],
    "parserOptions": {
        "ecmaFeatures": {
            "jsx": true
        },
        "ecmaVersion": 11,
        "sourceType": "module"
    },
    "plugins": [
        "react"
    ],
    "rules": {
    }
}
We also need a .eslintignore file to control where ESLint will run. This is especially important because (initially) during migration we are ONLY going to lint our new React code and Test code:
Here's a sample '.eslintignore' file (based on our .gitignore file and excluded more folders and file types):
.env*
node_modules
build
build_webpack
public
public
public_variant

# Core NodeJS/Express App Files & EJS View templates:
app.js
views
models

# Emacs:
*~
*#
.#*

# File Types:
*.sh
*.log
*.csv
*.json
*.html
*.css
*.cert
*.csr
*.pem
*.ejs

# Git
.git

# Cypress End to End tests (specifically include the /integration folder)
cypress
!cypress/integration
To Manually Run ESLint we'll add a script to our package.json:
"lint": "eslint --fix --no-error-on-unmatched-pattern src/**",
Now we can check ESLint is installed correctly by running:
$ npm run lint
We get the following warning that the Eslint-Plugin-React requires us to specify the React Version:
Warning: React version not specified in eslint-plugin-react settings. See https://github.com/yannickcr/eslint-plugin-react#configuration .
This warning is easily fixed by specifying settings.react.version in our .eslintrc.json as follows::
"settings": {
    "react": {
        // "detect" automatically picks the React version installed.
        // Or use `16.0`, `16.3`, to Lint to a specfic version.
        "version": "detect" // React version.
    }
}
We also get errors from the Jest tests which Ill come back to. For now we can exclde jest tests in .eslintignore by excluding files ending in .test.js:
*.test.js
When we run ESLint script:
$ npm run lint
We get some fomrat related errors, such as:
error Unexpected tab character no-tabs
Luckily we can easily disable the ESLint format rules that typically conflict with Prettier. By doing so, we are tidying up so Prettier takes care of format while ESLint can focus on code quality rules.
To disable ESLint format rules we can use eslint-config-prettier which is a Linter integration for Prettier.
We'll install the integration as follows:
$ npm install --save-dev eslint-config-prettier
Then we'll add "prettier" as the final config in the extends section of .eslntrc.json:
"extends": [
    "plugin:react/recommended",
    "standard",
    "prettier"
],
Now when we run ESLint, we get just a small number of errors which are genuine value add from ESLint "Standard" linting rules.
Install Husky for pre-commit/pre-push hooks:
We'll use Husky for pre-commit and pre-push hooks.
PRE-COMMIT HOOK:
Prior to commit I want to ensure code format and quality. This is the least demanding option. A developer can write code without worrying about fornat or linting (if she chooses) but cannot commit the code until it meets QS/Fotmat standard.
PRE-PUSH HOOK:
Prior to push I want to ensure that all tests run. This allows a developer to commit code locally with failing tests, but they cannot push code to the team or into the CI/CD stream with any failing tests.
$ npm install --save-dev husky
We'll add a new script to run our Jest tests in non-interactive mode, including coverage:
"settings": {
    ...
    "test:coverage": "react-scripts test --watchAll=false --coverage",
    ...
}
NOTE: The script uses -- --watchAll=false to run Jest in non-interactive mode so it completes (success|fail) without waiting for user input. This is the desired behaviour we want for ore pre-push Hook, as well as our CI/CD pipeline.
Finally we'll add two hooks below to package.json. These will run our checks when a developer runs a git commit or git push command:
"husky": {
    "hooks": {
      "pre-commit": "npm run prettier:check && npm run lint",
      "pre-push": "npm run test:coverage"
    }
},
At this point we can no longer commit code that is not formatted or fails ESLint standards.
Already this is a terrific start.
I was alerted to a variety of problems which imporved the code quality. The most interesting were:
- RULE: react/prop-types validation of react Component property types
- RULE: react/jsx-no-target-blank validation of
<a>link elements withtarget="_blank"(in particular this was an existing security vulnerability) - RULE: eslint/prefer-promise-reject-errors validation that Promise Rejection always passes an Error object
To make the process of fixiing each error, I created the following script show-lint-err.sh to run the lint and log the errors. Then I could fix one, and quickly relint.
# Clean old lint log:
rm -rf .lintlog

# Run lint and log output
npm run lint > .lintlog

# Show log of lint errors
less .lintlog
By now I also had Prettier formatting in realtime as well as Jest tests running on every fix. This was a very solid way to be writing code that took my own quality to a higher level and impoved my Javascript and React/JSX skills. I felt like my code was finally REALLY under control. And with ESLint and my Jest tests looking over my shoulder my coding has never felt better or safer.
Building out a CI/CD Pipeline
At this stage we want to test out our full build and deployment process, including migrated react components.
Essentiallly we want to create an automated process that will take our code from Git through build, testing, and deployment, and give visibility the team.
A 3 Stage Pipeline (CI, CD1, CD2)
We'll follow a 3 Stage Pipeline, as follows:
PIPELINE STAGE (CI) CI: Contnuous Integration: merge, build, run unit & integration tests
PIPELINE STAGE (CD1) CD1: Continuous Delivery (STAGING): deploy built app to Staging/UAT & end-to-end/acceptance tests
PIPELINE STAGE (CD2) CD2: Continuous Deployment (PRODUCTION): release tested app to Production
Initially we'll deploy to a Heroku staging/integration server. This allows to test the full deployment process, our full stack, and our Cypress End-to-End tests.
Later, when we're ready we'll eb able to confidently to deploy our migrated React components via CI/CD into PRODUCTION.
In summary we'll implement PIPELINE STAGES (CI) & (CD1) now. Later we'll complete PIPELINE STAGE (CD2).
Potential Technolgies:
There are a TON of CI/CD tools out there:
- Jenkins
- CircleCI
- TeamCity
- Travis CI
- GitLab CI (only makes sense if using GitLab for version control)
- BitBucket CI (only makes sense if using BitBucket for version control)
- Bamboo
- CodeShip
- etc etc...
More recent additins to the list would be:
- GitHub Actions CI/CD
- AWS CodePipeline
I was also curious about AWS CodePipeline (given we develop on AWS EC2, run test/UAT servers on AWS EC2, and deply to Heroku (which is build on top of AWS EC2).
I also wanted something battle-proven, simple to use, ideally free and open source. I was already familiar with then neme Jenkins. I had seen teams use it at a number of previous jobs. (Ok , maybe "simple to use" is pushing it a bit..!)
Anyway, after some research, 3 key facts swung me in favour of Jenkins:
- Jenkins is FREE
- jenkins is OPEN SOURCE
- Jenkins is TRUSTED (by big brand names, such as )
I was convinced.... until I discovered Github Actions CI/CD (released 2019) and a few hours research showed its rapidly growing popularity and people migating from Jenkins (and other CI/CD tools) .
The world runs on Git these days. GitLab has CI/CD. GitHub does too (since late 2019). Git is all about code control. CI/CD is all about building, testing and locating code based on source control (Git) activity. We already use GitHUb. So.... why not use a CI/CD pipeline thats integrated with our code, already has a strong community, and strives towoard open-source and sharing?
Even better there is a marketplace for pre-built GitHub Actions to get us running quickly. For example there are Actions for Run ESLint, jest, Run Cypress End-to-End Tests, Deploy to Heroku and more. Plus we can integrate with Jira and notify via Slack etc. There are Vulnerabilty Alerts and more. The list is almost endless, at ttime of writing there are almost 5000 open cource actions to use direetly or to fork and adapt to project specific needs.
Not wanting to risk an unpopular choice, I checked on Google Trends to compare search trends for Github Actions vs others.
It is clear that while CircleCI (purple line) had gained a leading position over JetBrains TeamCity (green line)) over the past 5 years, GitHub (the blue line) has leapt to #1 in less than 12 months.
GOOGLE TRENDS SHOWS RELATIVE SEARCH VOLUME:
===========================================
Note this comparison is by relative Google search volume, which reflects current interest.

Bear in mind the total usage of CirleCI, Teamcity and perhaps even Jenkins at this time is likely to be higher than GitHub Actions.

We are positioning for there the industry is moving: and that is to GitHub Actions.)
OK, decision made. Github Actions CI/CD is the way forward.
DECISION CAVEAT:
===============
Yes GitHub Actions are fairly new, and yes reading over articles written in 2019 (when it came out) showed various limitations, but with a solid platform and growing popularity its safe to bet on any major concerns being ironed out.

If we hit a roadblock with GitHub Actions, we can fall back to Jenkins (for reasons above) or CircleCI (for its sheer popularity).
Lets dive in!
To get a basic C/CD Pipeline in place I want to:
- automate merge and testing
- automate deployment to Staging
- automate our Cypress End-to-End/Acceptance tests against Staging
- get some basic reporting of Success or Failure (e.g. Slack, Telegram, Email)
Getting Started with GitHub Actions:
I was impressed how fast and easy it is to get started with Github Actions. Toward the end of my work I came across a great resource by Edward Thomson from the Github Actions team on getting started with Github Actions.
Basically, you create Action files in YAML format in .github/workspaces folder in your repository.
Inside a YAML Action file you specifiy the trigger event and tasks to run.
GitHub will then take these instructions and create a new container with your specified OS, checkout and install the code and run your tests.
For example, to trigger action when a push to master changes any .js files:
on:
  push:
    branches:
    # Push events on master branch
    - master
    paths:
    # Changes to .JS files
    - '**.js'
For example, to run in an ubuntu (LTS) container:
jobs:
  run-test-on-push:
    runs-on: ubuntu-latest
For example, to install Node 12, do and a clean install of packages and run tests:
  steps:
    - uses: actions/checkout@v1
    - name: Use Node.js 12.x
      uses: actions/setup-node@v1
      with:
        node-version: "12.x"
    - name: npm clean install, and test
      run: |
        npm ci
        npm test
Enable Email Notifications for Actions in Github:
You can see the results in GitHub or receive an email alert either of all actions or for failures only:.
View Action Executions in Github:
In Github, the Actions page shows tasks (as shown below). You can click into any task to dig deeper whch is helpful to debug if an Action fails.

With a working config you can quickly modify the YAML Action file to say, run on Staging or on a Release branch. Or to run on other OS's or versions of Node.
GitHub Action: Run Jest Tests on Node 12 Ubuntu LTS:
Here is a complete working GitHub Action YAML file to:
- trigger action when
- a push to master or staging changes
- any .js, .mjs, .json, or .yml files,
- to run in an ubuntu (LTS) container,
- to install Node 12,
- perform a clean install of node packages (
npm ci) - and finally run our jest (unit) tests (
npm test):
name: CI Pipeline Run Tests on Push Code Changes
on:
  push:
    branches:
    # Push events on master branch
    - master
    - staging
    paths:
    # Changes to .JS, .MJS or .JSON files (ie code or config changes)
    - '**.js'
    - '**.mjs'
    - '**.json'
    # Changes to GitHub CI Pipeline Actions (e.g. this Action!)
    - '**/.github/workflows/*.yml'
jobs:
  run-test-on-push:
    runs-on: ubuntu-latest

    steps:
    - uses: actions/checkout@v1
    - name: Use Node.js 12.x
      uses: actions/setup-node@v1
      with:
        node-version: "12.x"
    - name: npm clean install, and test
      run: |
        npm ci
        npm test
This gives enormous power, and with simple YAML text files, all our CI Pipeline can exist within our codebase. And no need to learn another UI.
Now we have some basic Github Action Workflow understanding, we can go ahead and build out our CI/CD Pipeline Github Action Workflows.
GitHub Action: Deploy to Staging
GitHub Action: Run Cypress End-to-End tests on Staging
Next we'll want to deploy to our staging server and run our End-to-End tests.
To support continuous integration we'll create a new branch called ci-delivery.
Every push from a dev-* branch will get merged into ci-delivery.
We'll then run our full tests including Jest and Cypress.
Then we'll merge ci-delivery branch into staging branch and deploy to Staging on heroku (same environment as Production) and verify our Cypress tests on Staging.
At that point we have Continous Integration (all code constanly merged) and Continuous Delivery (all code ready to ship). Later we can add a final step to deploy to Production to complete our basic CI/CD Pipeline.
(My thanks to Cypress.io for the useful blog post on Github Actions for Cypress. and on Cypress's GitHub Action Documentation
Here are the main Workflows in our Github Actions fo CI/CD:
- Manual push a dev branch (by developer).
- ACTION WORKFLOW (Pipeline Stage CI): On Push branch dev-* Merge dev branch to ci-delivery branch and run jest tests. If success, push to ci-delivery.
- ACTION WORKFLOW (Pipeline Stage CI): On Push to ci-delivery, clean install, run jest, run Cypress. On success, merge and push ci-delivery to staging branch.
- ACTION WORKFLOW (Pipeline Stage CD1): On push to staging branch, deploy to Staging Heroku, run Cypress tests against Staging.
- MANUAL (Pipeline Stage CD2): Merge and push staging branch to master. (This can be automated once we build confidence in the process, but initially I prefer to retain control of when we deply to production.)
- ACTION WORKFLOW (Pipeline Stage CD2): On Push to master, deploy to Production Heroku
Workflow 1: Merge, Test and Tag Release Candidate:
Here is our complete Github Action Workflow. Feel free to use this code and modify t your needs. (It is quite complete, with the one notable exception that you should encrypt your KEYS.)
Workflow triggers on:
- any push to a branch prefixed with "dev-base-", limited to code changes that relate to our React code or config changes (.js, .mjs, .json) and Action Workflow (YAML) files.
Pipeline Task:
To Merge Dev & Run Cypress (on HEROKU ci-delivery instance), Push to CI-DELIVERY branch
The main steps are:
Here is a list of all the steps included in the workflow. Some you may decide are unneccessary, such as logging code changes or linting commit messages. I preferred to start strict and with tight commit standards and plenty of logging to support investigation of any issues while we build confidence in the pipeline and get used to common causes of failure (if occurs).
PreTest:
Before testing, we need to merge the code into a local copy of our CI-DELIVERY branch, install packages and run any pre-test flight checks, like code linting.
- Dump GitHub Branch (so we have a record of the DEV branch that initiated the Workflow)
- Checkout our ci-branch (we'll then merge the changes branch)
- Merge (pull) of Pushed (dev) Branch
- Print Summary of Last Tag and Commits in this CI/CD Run so we know the baseline tag and all commits tht are being merged (helpful if the workflow fails)
- Show Commited Code Changes in this run (helpful to see what were the code changes if the workflow fails)
- Install Node.js 12.x
- Do npm clean install of all packages (as defined in package.json)
- Lint all Commit Messages since Last Tag (to enforce Commit standards)
Unit Test (Jest)
OK, now we can run our Unit Tests locally:
- Run Jest/Unit tests
Build a Distribution for Heroku
- Install RequireJS (r.js) - This is specific to our codebase. We use RequireJS to build the Backbone app. (I much prefer using Webpack as we do for React. I guess it shows how far build tools have evolved since we opeted for RequireJS, which seemed to make sense back in 2014!)
- Build & Commit Distribution Files (specific to our codebase, this execues the RequireJS to compile and generate the distribution files). The commit here is important so they are then included in the deployment to Heroku.
Deploy to Heroku (as a CI Integration Test Server)
Now we can deploy our merged code to a Heroku App to run UAT:
- Deploy to HEROKU (about to deploy to a remote called "CI-HEROKU")
- Install heroku
- Set authorization and verify by listing remote herokus (to be sure installed OK)
- Set local heroku remote and rename to CI-HEROKU
- Start Heroku 'ci-delivery' instance (ready for deploy)
- Then we can apply some settings to our Heroku App:
- Set NODE_ENV to staging
- Set INJECT_WEBACK_REACT to 'on' to enable injection of React (This provides Feature Control so we can turn React ON/OFF, allowing deployment to codebase to Production without turning React on until we have completed the migration)
- Set NPM_CONFIG_PRODUCTION to 'true' to avoid installing devDependencies
That was a LOT of setup. But we've successfully run Jest locally and Cypress on a Heroku server. So, we can now create a Release Candidate ready for deployment to our Staging Heroku server (via a separate workflow).
Now we can:
- Deploy our local merged CI-DELIVERY branch to HEROKU, then
Run Cypress UAT Tests on Heroku App:
- Run Cypress Tests (on our CI-Heroku app)
- Tag Release Candidate RC Semantic Version (e.g v3.1.2-RC.0 ..."
- Push Merged and Built Code, and RC Tag to our branch CI-DELIVERY
Tidy up:
- Shutdown Heroku 'ci-delivery' instance, ready for next Workflow run.
Note: In the workflow below, we have:
- ci-delivery (branch)
- ci-delivery (heroku app at ci-delivery.herokuapp.com)
- ci-heroku (local rename of heroku remote to ci-heroku)
Here is the full Github Action Workflow YAML File:
name: WORKFLOW - Merge Dev & Run Cypress (on HEROKU ci-delivery instance), Push to CI-DELIVERY branch
on:
  push:
    branches:
    - dev-base-*
    paths:
    # ONLY run for code changes: .JS or .JSON files (ie code or config changes)
    - '**.js'
    - '**.mjs'
    - '**.json'
    # Changes to GitHub CI Pipeline Actions (e.g. this Action!)
    - '**/.github/workflows/*.yml'


jobs:

  job-merge-deploy-HEROKU-CI-push-on-success:
    runs-on: ubuntu-latest
    steps:
    - name: Dump GitHub Branch
      env:
        GITHUB_REF: ${{ toJson(github.ref) }}
      run: echo "$GITHUB_REF"


    - name: Checkout direct should be our ci branch not the changes branch
      uses: actions/checkout@v2
      with:
        fetch-depth: 0
        ref: ci-delivery
        # IMPORTANT: By default downstream actions will not trigger on
        # the PUSH action in this workflow because they run on the
        # default GITHUB_TOKEN. The *ONLY* way to let this workflow trigger
        # the 'next' action based on the PUSH event is to use
        # a PAT (Personal Access Token)
        # SEE: https://github.com/ad-m/github-push-action/issues/32
        # To Create a PAT token like the one used below:
        # SEE: https://docs.github.com/en/github/authenticating-to-github/creating-a-personal-access-token
        token: {paste your PAT token here}


    - name: Merge (pull) of Pushed Branch
      run: |
        git config user.name {your github username}
        git config user.email {your github email}
        echo "About to pull..."
        git pull origin ${{ github.ref }}
        git status


    - name: Summary of Last Tag and Commits in this CI/CD Run
      run: |
        echo "Show LAST Tag (prior to this CI/CD run).."
        git describe --tags --abbrev=0
        echo "Show commits since last Tag.."
        git log $(git describe --tags --abbrev=0)..HEAD --pretty=medium


    - name: Show Commited Code Changes in this run
      run: |
        echo "Show commits since last Tag WITH Code Changes.."
        git log $(git describe --tags --abbrev=0)..HEAD --pretty=medium -p


    - name: Install Node.js 12.x
      uses: actions/setup-node@v1
      with:
        node-version: "12.x"


    - name: Do npm clean install
      run: |
        npm ci


    - name: Lint all Commit Messages since Last Tag
      run: |
        echo "Lint the COMMIT messages since last tag.."
        npx commitlint --from=HEAD~$(git rev-list $(git describe --abbrev=0)..HEAD --count) --verbose


    - name: Run Jest/Unit tests
      run: |
        npm run test:coverage


    - name: Install RequireJS (r.js)
      run: |
        echo "About to install RequireJS as global.."
        npm install -g requirejs
        echo "Verify r2.js is installed.."
        ls | grep r2.js


    - name: Build & Commit Distribution Files
      run: |
        echo "About to run Build & Commit dist/dist2 (via ./build-prep-for-deploy-ci.sh).."
        ./build-prep-for-deploy-ci.sh


    - name: Deploy to HEROKU-CI
      run: |
        echo "Deploying to Heroku.."


    - name: install heroku and verify version
      run: |
        sudo snap install --classic heroku
        heroku --version


    - name: set authorization and verify by listing remote herokus
      run: |
        export HEROKU_API_KEY='{paste your HEROKU API Key here}'
        heroku apps


    - name: set local heroku remote and rename to CI-HEROKU
      run: |
        export HEROKU_API_KEY='{paste your HEROKU API Key here}'
        heroku git:remote -a ci-delivery
        git remote rename heroku ci-heroku
        git remote -v


    - name: Start Heroku 'ci-delivery' instance (ready for deploy)
      run: |
        export HEROKU_API_KEY='{paste your HEROKU API Key here}'
        echo "Starting CI-DELIVERY Heroku Instance..."
        heroku ps:scale web=1 --app=ci-delivery
        heroku maintenance:off --app ci-delivery


    - name: push local CI-DELIVERY branch to HEROKU
      run: |
        export HEROKU_API_KEY='{paste your HEROKU API Key here}'
        echo "Set NODE_ENV for ci-heroku... to 'staging'"
        heroku config:set  NODE_ENV=staging --remote ci-heroku
        echo "Set INJECT_WEBACK_REACT for ci-heroku... to 'on' to enable injection of React"
        heroku config:set  INJECT_WEBACK_REACT=on --remote ci-heroku
        echo "Set NPM_CONFIG_PRODUCTION for ci-heroku... to 'true' to avoid installing devDependencies."
        echo "  Note this means npm scripts see NODE_ENV as PRODUCTION, but our app still sees as CI"
        echo "  SEE: https://devcenter.heroku.com/articles/nodejs-support#only-installing-dependencies"
        heroku config:set  NPM_CONFIG_PRODUCTION=true --remote ci-heroku
        echo "OK lets push local branch to HEROKU..."
        # ----------------------------------------------------------
        # NOTES: on authorizing for Heroku
        # ----------------------------------------------------------
        # SEE: https://github.com/actions/heroku/issues/10
        #   ALSO: Exporting the HEROKU_API_KEY  openly is a security vulnerability.
        #   Better to use Secrets for auth, SEE .netrc in
        #         https://gist.github.com/spk/7be27d8f0f9fa0264fa24417ec40c742
        # NOTE: Use of --force below, because we have local changes here (our new DIST files committed above)
        # ----------------------------------------------------------
        git push --force https://heroku:$HEROKU_API_KEY@git.heroku.com/ci-delivery.git ci-delivery:master


    - name: Run Cypress Tests on Heroku
      uses: cypress-io/github-action@v2
      with:
        wait-on: 'http://{your heroku app id}.herokuapp.com/'
        config: pageLoadTimeout=240000,baseUrl=http://{your heroku app id}.herokuapp.com/


    - name: Unset NPM_CONFIG_PRODUCTION (to Heroku default behaviour)
      run: |
        export HEROKU_API_KEY='{paste your HEROKU API Key here}'
        echo "Unset NPM_CONFIG_PRODUCTION for ci-heroku to return to Heroku default installation of devDependencies"
        echo "  SEE: https://devcenter.heroku.com/articles/nodejs-support#only-installing-dependencies"
        heroku config:unset NPM_CONFIG_PRODUCTION --remote ci-heroku


    - name: Tag Release Candidate RC Semantic Version
      run: |
        echo "Create Versioned Release Candidate vx.x.x-RC.x ..."
        npm run release:rc
        echo "git: list RC Release Candidate Tags.."
        git tag -ln v*-RC.*


    - name: Push to CI-DELIVERY
      run: |
        echo "Git status.."
        git status
        echo "About to push.."
        git push --follow-tags origin ci-delivery
        echo "Git push DONE, checking status.."
        git status
    - name: Shutdown Heroku 'ci-delivery' instance
      run: |
        export HEROKU_API_KEY='{paste your HEROKU API Key here}'
        echo "Stopping CI-DELIVERY Heroku Instance..."
        heroku ps:scale web=0 --app=ci-delivery
        heroku maintenance:on --app ci-delivery
Triggering Workflows with Github Personal Action Tokens:
By default downstream actions will not trigger on the PUSH action in this workflow because they run on the default GITHUB_TOKEN.
The ONLY way (that I know of!) to let this workflow trigger the 'next' action based on the PUSH event is to use a PAT (Personal Access Token).
You will also need to know how to Create a PAT token.
Heroku Authorization:
Exporting the HEROKU_API_KEY openly is a security vulnerability.
Better to use Secrets for auth. SEE notes on .netrc here
YAML Files and Globstars:
These two tools are also helpful when creating YAML files:
- Writing YAML files is fickle work and easy to mess up with a small error in whitespace. I eventually added YAML linting (see later section) as a pre-commit hook to catch errors quickly before they stop failing Action runs in Github (which just slows the develeopment process).
- You can manually paste and check valid YAML here: https://onlineyamltools.com/validate-yaml
- For creating paths for code changes to trigger a workflow, you can check valid paths here: https://globster.xyz/
============
SIDE BAR:
Beyond Delivery: Unexpected Benefits of our CI/CD Pipeline:
============
Our first cut CI/CD pipeline provided value almost immediately. It exposed work needed around deployment to our Prduction Environment (Heroku) and an unknown bug.

   - (1) deployment to Heroku
   - (2) showed a longterm bug (for a specific rare case).

1) DEPLOYMENT to HEROKU:
---------------------
IN our development migration from Backbone to React we had used Webpack to support hot deployment in Dev. And had produced our Webpack config for Production. However, at not time had our code been deployed from a DEV environment (EC2 instance) to our Staging/Production environents (Heroku).

The CI/CD Pipeline forced the deployment to Heroku (Staging) and so clarified several configuration steps neccessary for the deployment.

(These included, package.json devDependencies and heroku config params.)


2) EXISTING (unknown) BUG:
-------------------------
In fact, at first I was blaming the environent, or Cypress loading libraries in different orders - or even running too fast!  In the end I had to acknowledge we'd just uncovered a long runnning bug.

In this case it was a fairly benign failure, with no consequences to the user. But I am humbled, and forced to look squarely at the power of our new CI/CD Pipeline for exposing such errors and hence improving code quality.

I also found that debugging Cypress can only be efficiently done in a browser. Sure, in theory, its great to develop on an EC2 instance in a headless browser. And that is how I wrote all our acceptace test to date. BUT..
But really, a local browser test lets you step through actual code to investigate unexpected app errors in Cypress tests.  This is the fastest way to resolve bugs.
TODO: CI/CD Pipeline Outstanding Tasks:
=======================================
1) Security: Our Heroku keys are exposed via the Github Actions. Our repo is private, so this is not urgent, but our keys should be protected.

2) Deploy to Production: Our current pipeline completes with RC (Release Candidates) auto-deployed to Staging Heroku.  I left the final step to deploy to Production for later.

This is for several reasons which will naturally dissolve with time:
- retain absolute control for production releases, while we:
  - build up confidence in the CI/CD Pipeline RC builds to Staging
  - build a more robust set of Cypress Acceptance Tests
  - complete the migration of ALL views from Backbone to React
Setting Up CI Auto-Versioning, with Standard-Version, Husky, Commitlint and Commitizen
With our CI/CD pipeline in place, I want to automatically create Release Candidate versions/(Git Tags) for each Dev Push that succeeds through the CI/CD Pipeline to deploy to Staging.
(NOTE: Staging is our current CI/CD pipeline end. We are not releasing to Production (YET!) -- but this IS possible, including our React code using Feature Control, which I will get to.)
For Auto-Versioning, following the conventions of Semantic Versioning I narrowed down two main choices for "as much auto versioning" as we need:
- Standard-Version
- Semantic-Release
The two are fairly similar in that they automtically read commits since last Reelease and generate new Release Versions, Tags, Change Logs etc. The main difference is that Standard-Version keeps everything on the local git, allowing a final manual decision to make any changes prior to release. Semantic-Release will go ahead and auto push/publish releases.
I decided to use Standard-Version to get the most benefits while retaining control. Later, when we are more familiar with in the process we can switch to Semantic-Release.
So, to set up our Auto Versioning we need to follow some rules. We'll use Conventional Commits, which describes itself as "A specification for adding human and machine readable meaning to commit messages".
This then allows us to use tools to choose the Version Numbers (bug fix, feature, breaking change).
We can also get automatic changelogs, as well as improve the structure of our commits giving more consistent messages across the team.
A summary of Conventional Commits is here.
We'll use the following two packages to handle our commit convention:
- Commitlint - will verify our commit messages conform to standard
- Commitizen - will make writing commit messages easy.
OK, let's install everything...
Install Commitlint
Install @commitlint/cli and @commitlint/config-conventional as a dev dependencies:
$ npm install --save-dev @commitlint/{config-conventional,cli}
Add a commitlint.config.js file to configure our commitlint config:
module.exports = {
  extends: ['@commitlint/config-conventional']
};
And a commitlint hook to Husky (in package.json):
  "husky": {
    "hooks": {
      ...
      "commit-msg": "commitlint -E HUSKY_GIT_PARAMS",
      ...
    }
  },
Our commit messages will now need to conform to conventionalcommits.org, which defines a basic format as follows:
<type>[optional scope]: <description>

[optional body]

[optional footer]
So now, when we try to commit with a message that does not conform, such as:
$ git commit -m "Added commitlint"
Our Husky hook will fire up Commitlint and we get a warning (like below) and our commit is rejected:
husky > commit-msg (node v12.17.0)
?   input: Added commitlint
?   subject may not be empty [subject-empty]
?   type may not be empty [type-empty]

?   found 2 problems, 0 warnings

husky > commit-msg hook failed (add --no-verify to bypass)
So, lets get sime help from Commitizen!
Install Commitizen with Change Logs:
Commitizen CLI can be installed globally or locally. I prefer local, which means I dont need ot use sudo to istall, and all developers can run the same version
$ npm install --save-dev commitizen
Then use npx to init the cz-conventional-changelog adapter:
$ npx commitizen init cz-conventional-changelog --save-dev --save-exact
This installs and updates package.json to add cz-conventional-changelog as a devDependeny, plus adds the following config entry:
  "config": {
    "commitizen": {
      "path": "./node_modules/cz-conventional-changelog"
    }
   }
And a commitizen hook to Husky (in package.json):
  "husky": {
    "hooks": {
      ...
      "prepare-commit-msg": "exec < /dev/tty && git cz --hook || true",
      ...
    }
  },
Now when we commit, Comittizen will guide our commit to meet convention:
SO, lets again try to commit with a message that does not conform, such as:
$ git commit -m "Added commitlint"
Now commitizen will offer us a choice, and we can use UP/DOWN arrow keys to select:
husky > prepare-commit-msg (node v12.17.0)
cz-cli@4.2.1, cz-conventional-changelog@3.3.0

? Select the type of change that you're committing: (Use arrow keys)
? feat:     A new feature
  fix:      A bug fix
  docs:     Documentation only changes
  style:    Changes that do not affect the meaning of the code (white-space, formatting, missing semi-colons, etc)
  refactor: A code change that neither fixes a bug nor adds a feature
  perf:     A code change that improves performance
  test:     Adding missing tests or correcting existing tests
  build:    Changes that affect the build system or external dependencies (example scopes: gulp, broccoli, npm)
 ci:       Changes to our CI configuration files and scripts (example scopes: Travis, Circle, BrowserStack, SauceLabs)
  chore:    Other changes that don't modify src or test files
  revert:   Reverts a previous commit
IN fact Commitizen guides thw whole comment, including Breaking Changes and Open Issues:
husky > prepare-commit-msg (node v12.17.0)
cz-cli@4.2.1, cz-conventional-changelog@3.3.0

? Select the type of change that you're committing: build:    Changes that affect the build system or external dependencies (example scopes:
gulp, broccoli, npm)
? What is the scope of this change (e.g. component or file name): (press enter to skip) npm
? Write a short, imperative tense description of the change (max 88 chars):
 (83) added commitlint and commitizen for Standard Commits (SEE: conventionalcommits.org)
? Provide a longer description of the change: (press enter to skip)

? Are there any breaking changes? No
? Does this change affect any open issues? (y/N) N
The generated commit is:
build(npm): added commitlint and commitizen for Standard Commits (SEE: conventionalcommits.org)
WOW! How cool is that?!
We now have our project setup to provide and maintain commit messages, that conform to the Conventional Commits standard for the whole team.
Plus that now opens the door to automatic semantic versioning. So, lets go ahead and install standard-version.
Install Standard-Version
Lets install standard-version as a devDependency to automatically update our semantic versioning for Release Candidate versions/(Git Tags) and to generate the changelog for the changes in the release.
$ npm install --save-dev standard-version
And we'll add some release scripts to package.json:
  "scripts": {
    ...
    "release:dry": "HUSKY_SKIP_HOOKS=1 standard-version --dry-run",
    "release:rc": "HUSKY_SKIP_HOOKS=1 standard-version --prerelease RC",
    "release:prod": "HUSKY_SKIP_HOOKS=1 standard-version",
    ...
  }
}
In the scripts above, we can run:
Dry Release - this is optional, but gives a preview of changes that "would" execute. I found it helpful when we were getting up and running with standard-version but now rarely use it.
$ npm run release:dry
Release Candidate RC - to create Pre-Release Candidate Versions in our CI/CD Pipeline, such as v2.3.1-RC.1, v2.3.1-RC.2:
$ npm run release:rc
Production Release - to create real Production Release Versions, such as v2.3.1:
$ npm run release:prod
NOTE: The HUSKY_SKIP_HOOKS above will disable our Husky hooks. This stops the Standard-Version auto-commit step from hanging (when Husky would trigger commitizen, which expects user input).
Now we can update our GitHub Action Workflow to auto-generate our release candidate tags with the following:
npm run release:rc
git push --follow-tags origin ci-delivery
Run Commit Message Linting in CI/CD
Now we have a tag for each release candidate, we can lint the commit messages in CI/CD. This will catch issues if a developer has made a non-compliant commit, for example without running commit linting locally.
So, in our CI/CD, we can log all commits since the last Tag:
$ echo "Show LAST Tag (prior to this CI/CD run).."
$ git describe --tags --abbrev=0
And we can lint the commit messages:
$ echo "Show commits since last Tag.."
$ git log $(git describe --tags --abbrev=0)..HEAD --pretty=medium
Or we can even include all code changes by adding the -p flag. This may not be needed, and may produce large logs, but may be helpful in reviewing the changes in a specific release where the CI/CD build fails.
$ echo "Show commits since last Tag WITH Code Changes.."
$ git log $(git describe --tags --abbrev=0)..HEAD --pretty=medium -p
Finally we can Lint the commit messsages:
$ echo "Lint the COMMIT messages since last tag.."
$ npx commitlint --from=HEAD~$(git rev-list $(git describe --abbrev=0)..HEAD --count) --verbose